Holy smokes a garb post! Meet the “tunica strictoria”.

I’m excited that Late Antiquity has finally been noticed by the SCA. Well, I think more than likely a post by the wonderful Ratna Drost on Facebook is what was noticed, but as somebody working on my PhD specifically in Late Antiquity (yes, not middle Byzantium, look, there’s a story here and it requires booze) I was happy to help to the best of my limited availability to help parse this pattern.

The tunica strictoria appears to be a relatively new-ish term for the long sleeve tunics worn in the 4th-6th Centuries during the waning days of the Western Roman Empire. It wasn’t everybody’s fashion, but it shows up frequently in some visual sources.

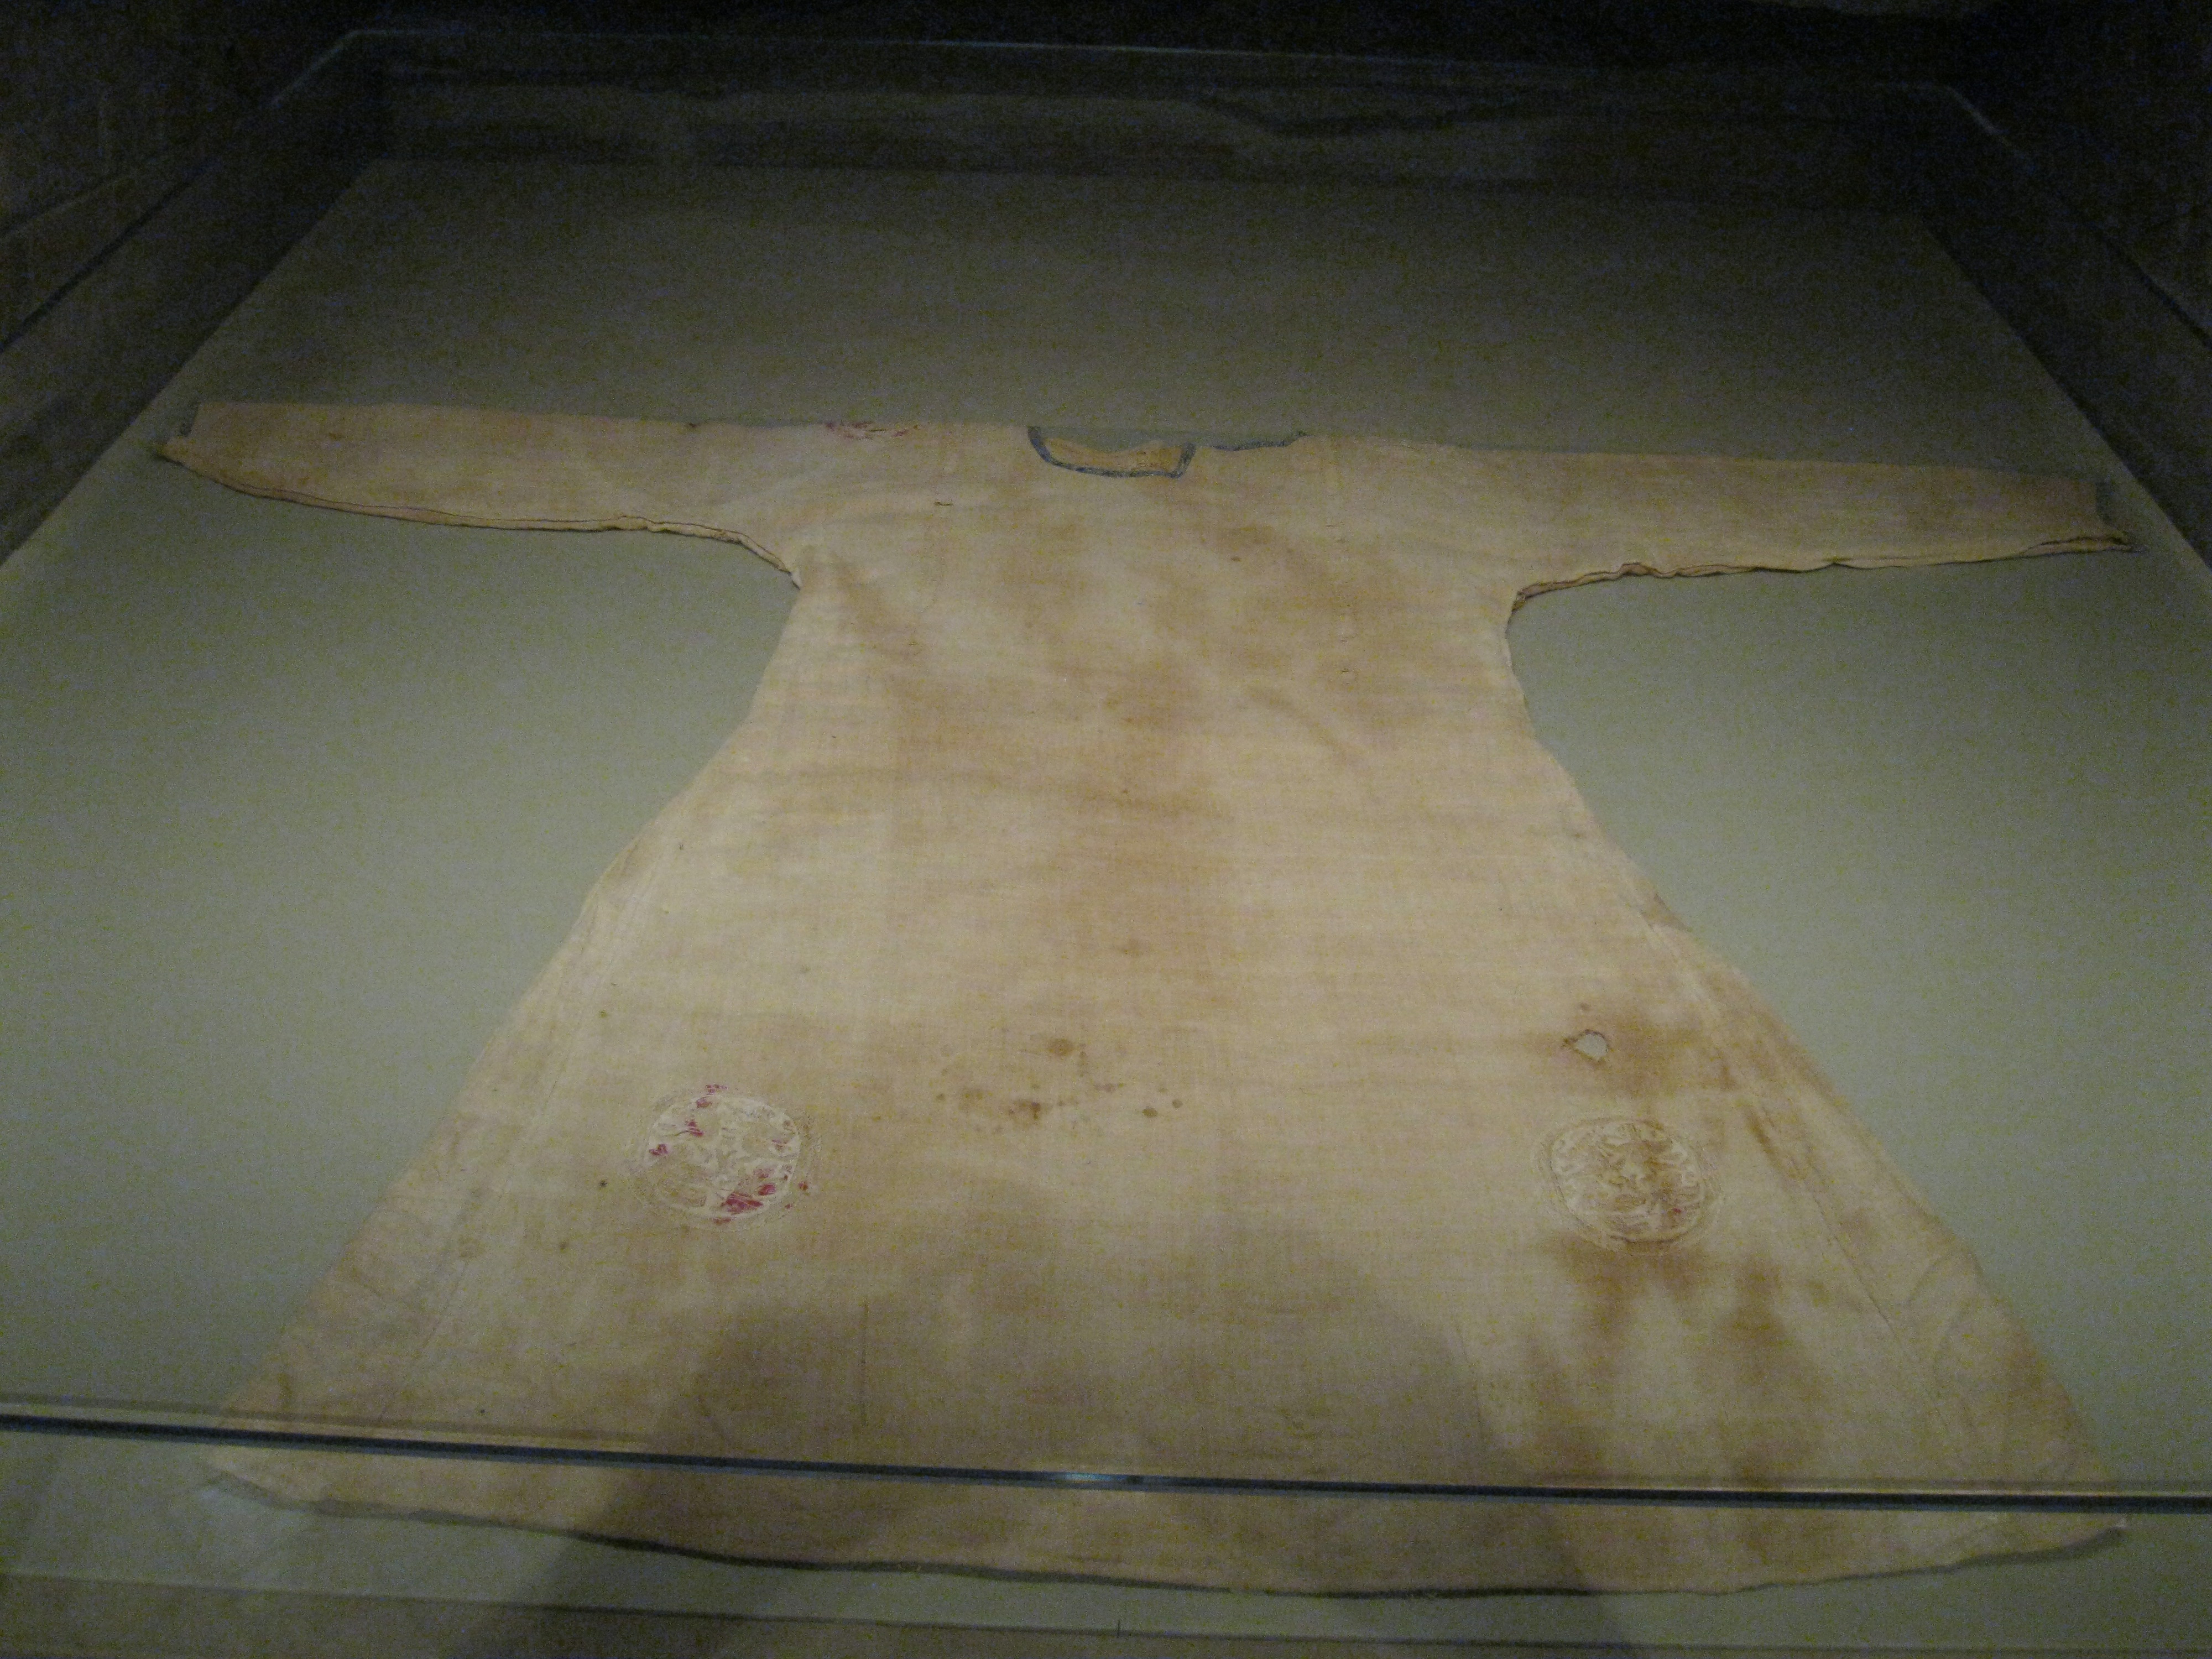
A lot of folks bring up the photo taken by Amy E. Place in her Doctoral Dissertation, “Fashioning Identity in the Late Roman and Late Antique World: The Case of North Africa”, of the Personification of July. In this example, July is wearing a dalmatica over the tight-sleeved tunica strictoria, but you see very little detail as to how these tunics were patterned. And the problem is that we have more than one way to skin a cat here.

For the most part, a strictoria has tight sleeves. That appears to be the ONLY qualifier regardless of body width or slits beneath the arms to allow for unrestricted movement. Here are some photos I took at the Villa Romana del Casale in Sicily this summer. Mostly of men’s dress. These mosaics date to the 5th Century:

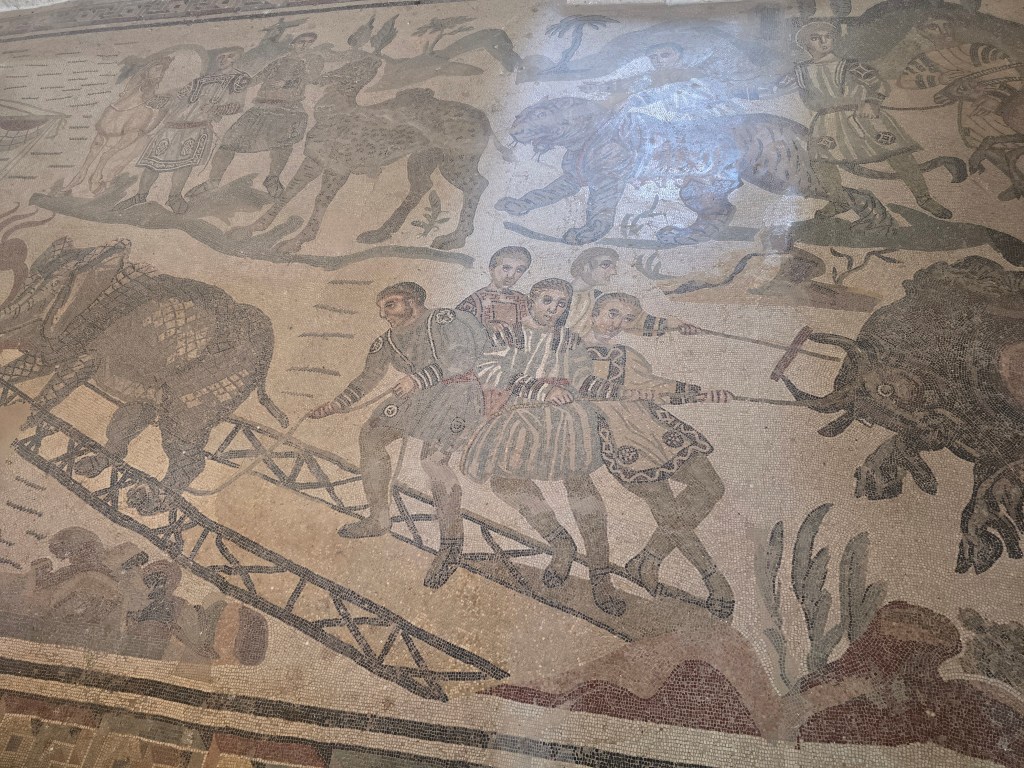
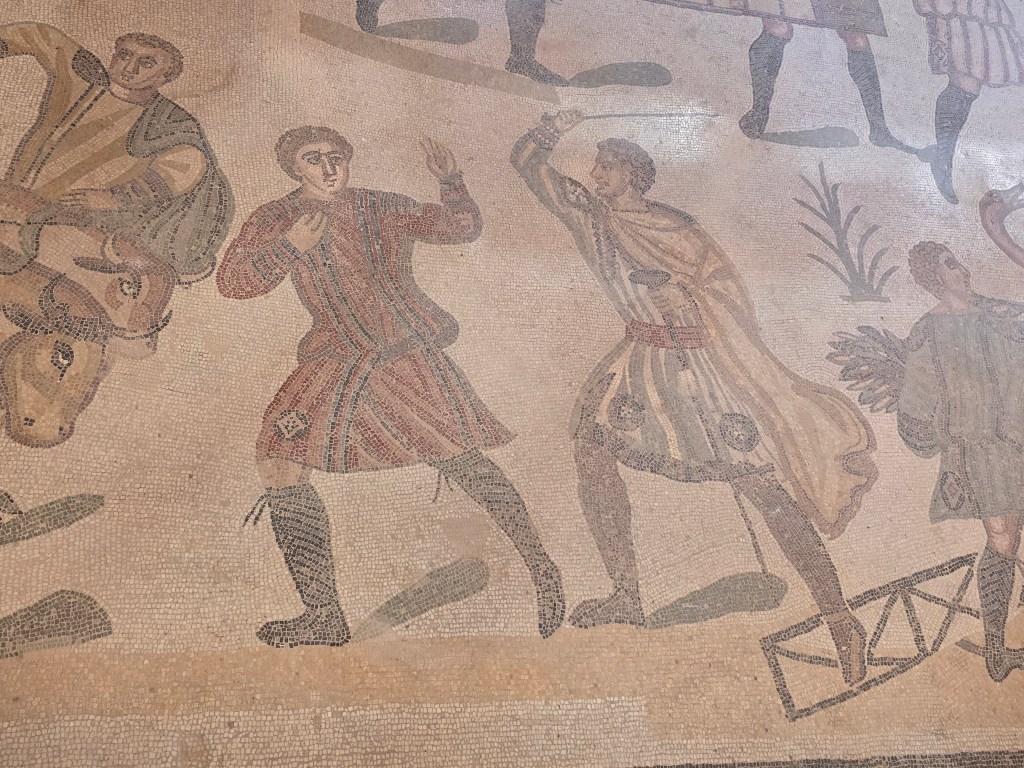
The male figures in this collection are clearly wearing strictoriae, yet the women and the high priest are clearly wearing dalmaticae with what could be strictoriae beneath. This is however, Sicilian fashion, not Egyptian, not Tunisian, not Levantine. And we need to continue to push that Rome, especially Late Rome, was never a monolith, however it’s clear these garments were very full and wide-bodied, as seen here in this image from the Hall of the Small Hunt at the Villa, versus the Ambulatory of the Great Hunt, which shows the men belted. (I will be discussing the variances in detail in my dissertation and will be happy to teach a class on this AFTER I graduate. Please respect my time and research embargo while I complete this endeavor.)

I do want to point out that it is very common in SCA circles to refer to this style as “Coptic” tunics, however this art is from Sicily, and we have seen a variety of examples from beyond Egypt. “Coptic” itself has a very specific cultural meaning for Egypt, so I advise that we begin moving away from this descriptor when discussing Late Antique dress at large.

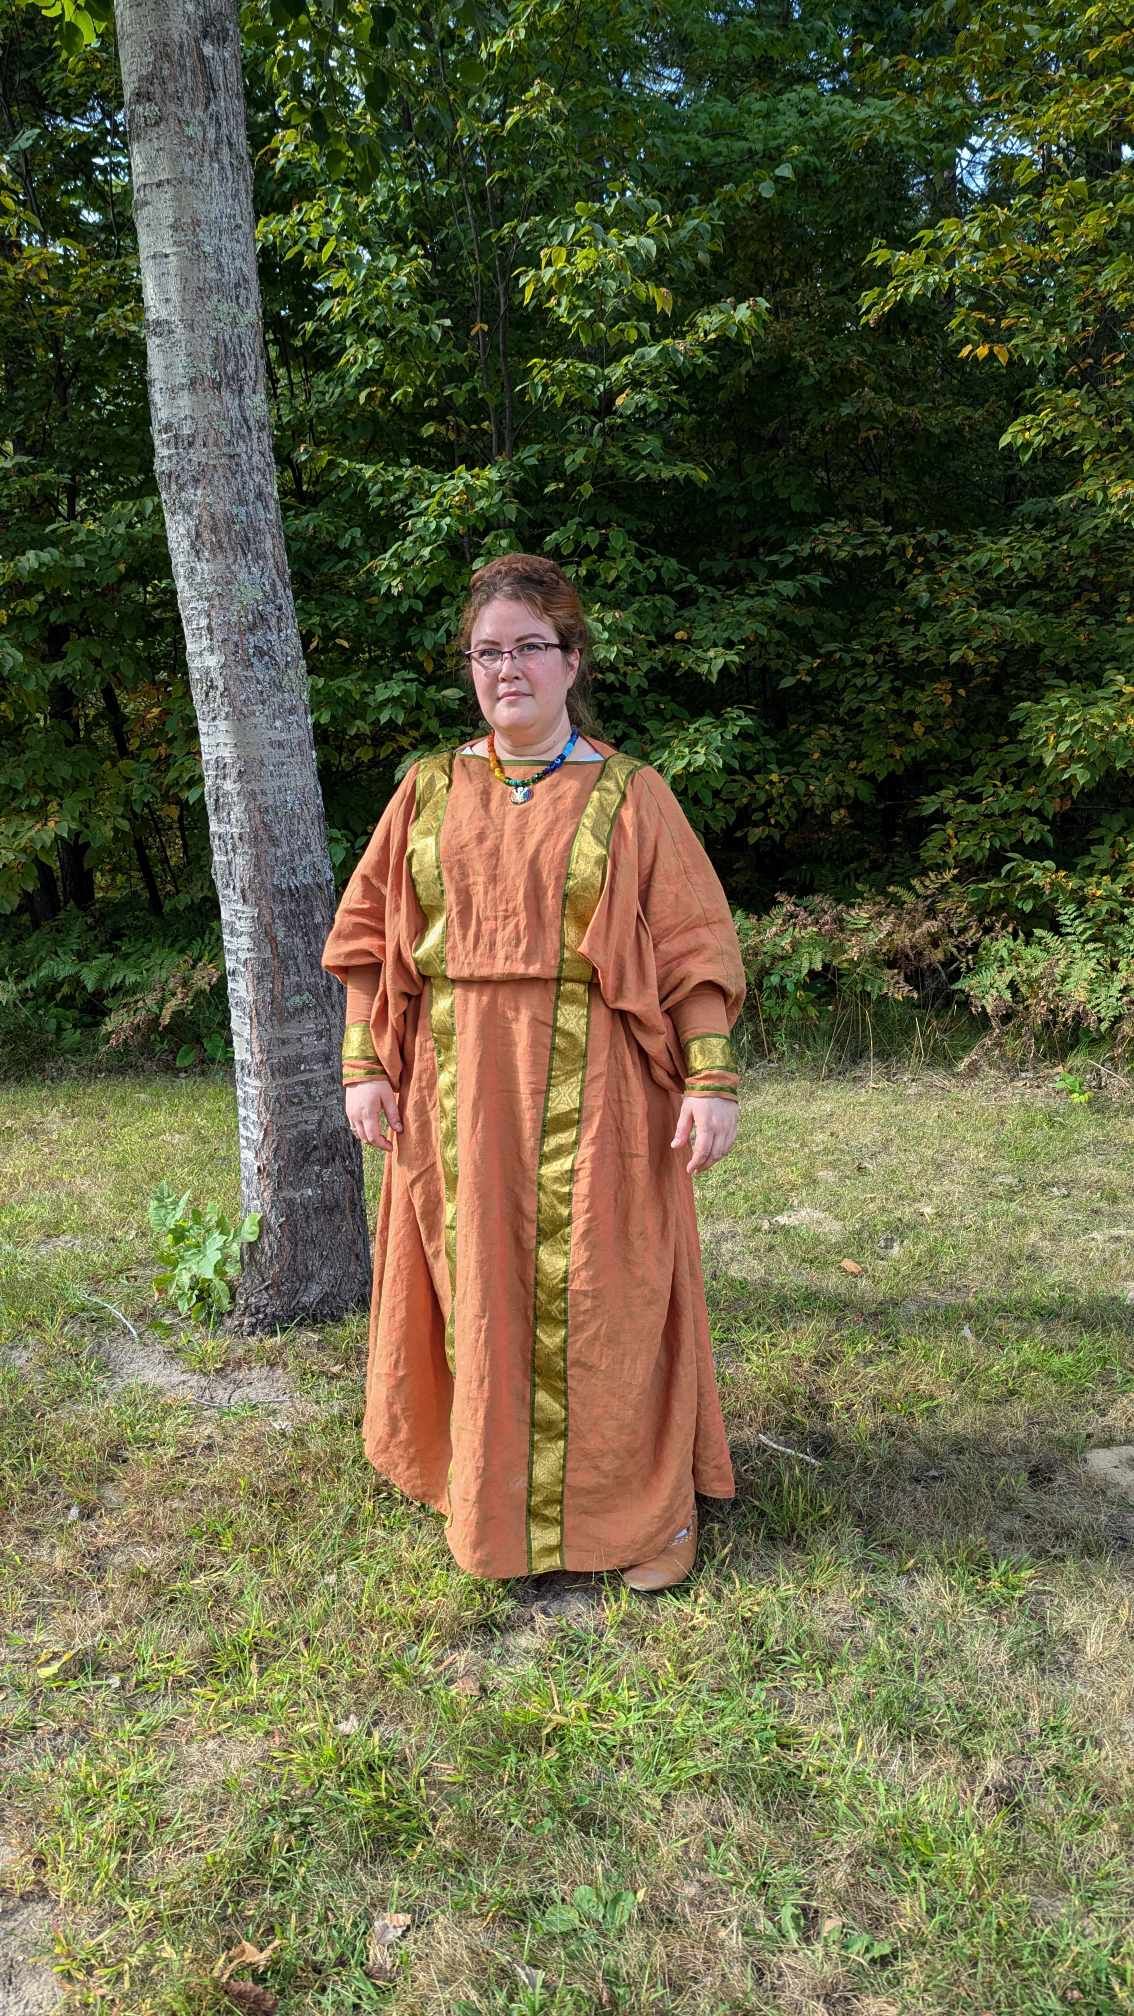
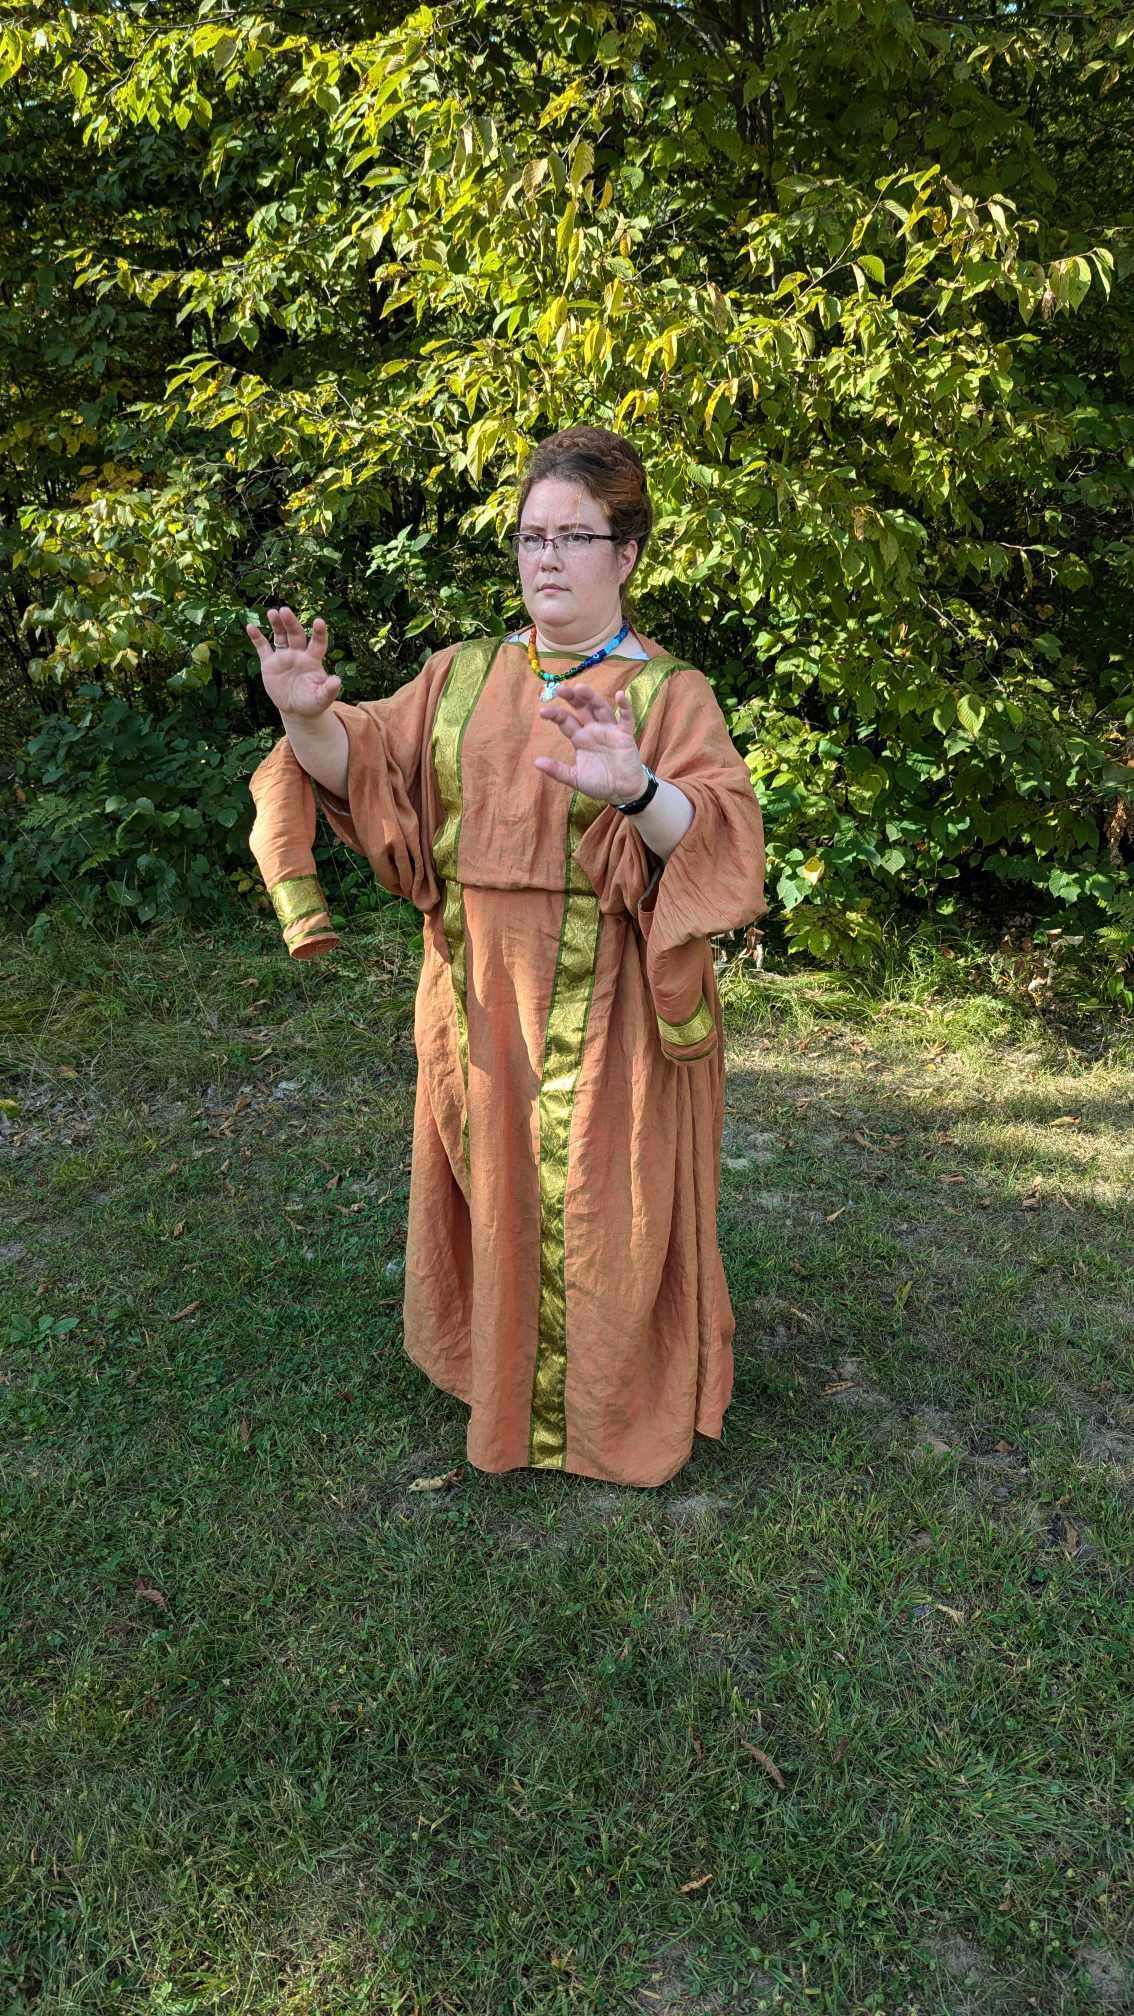
The version of this tunica that seemed to strike the fancy of Facebook was that with the underarm slits. This was the recreation that Ratna Drost posted that caught the attention of many, so I attempted to help by drafting this very fast pattern that I took a picture of in the epitome of professionalism. My knowledge leads me to believe that the slits are a product of Eastern influence coming from Sassanian Persia, and were not present in every garment. It’s a feature, and not a requirement, so if it’s something that doesn’t work for you, you do not have to include them, and you can still achieve the blousing.

This, coupled with the pattern from the “Cut My Cote” volume here:

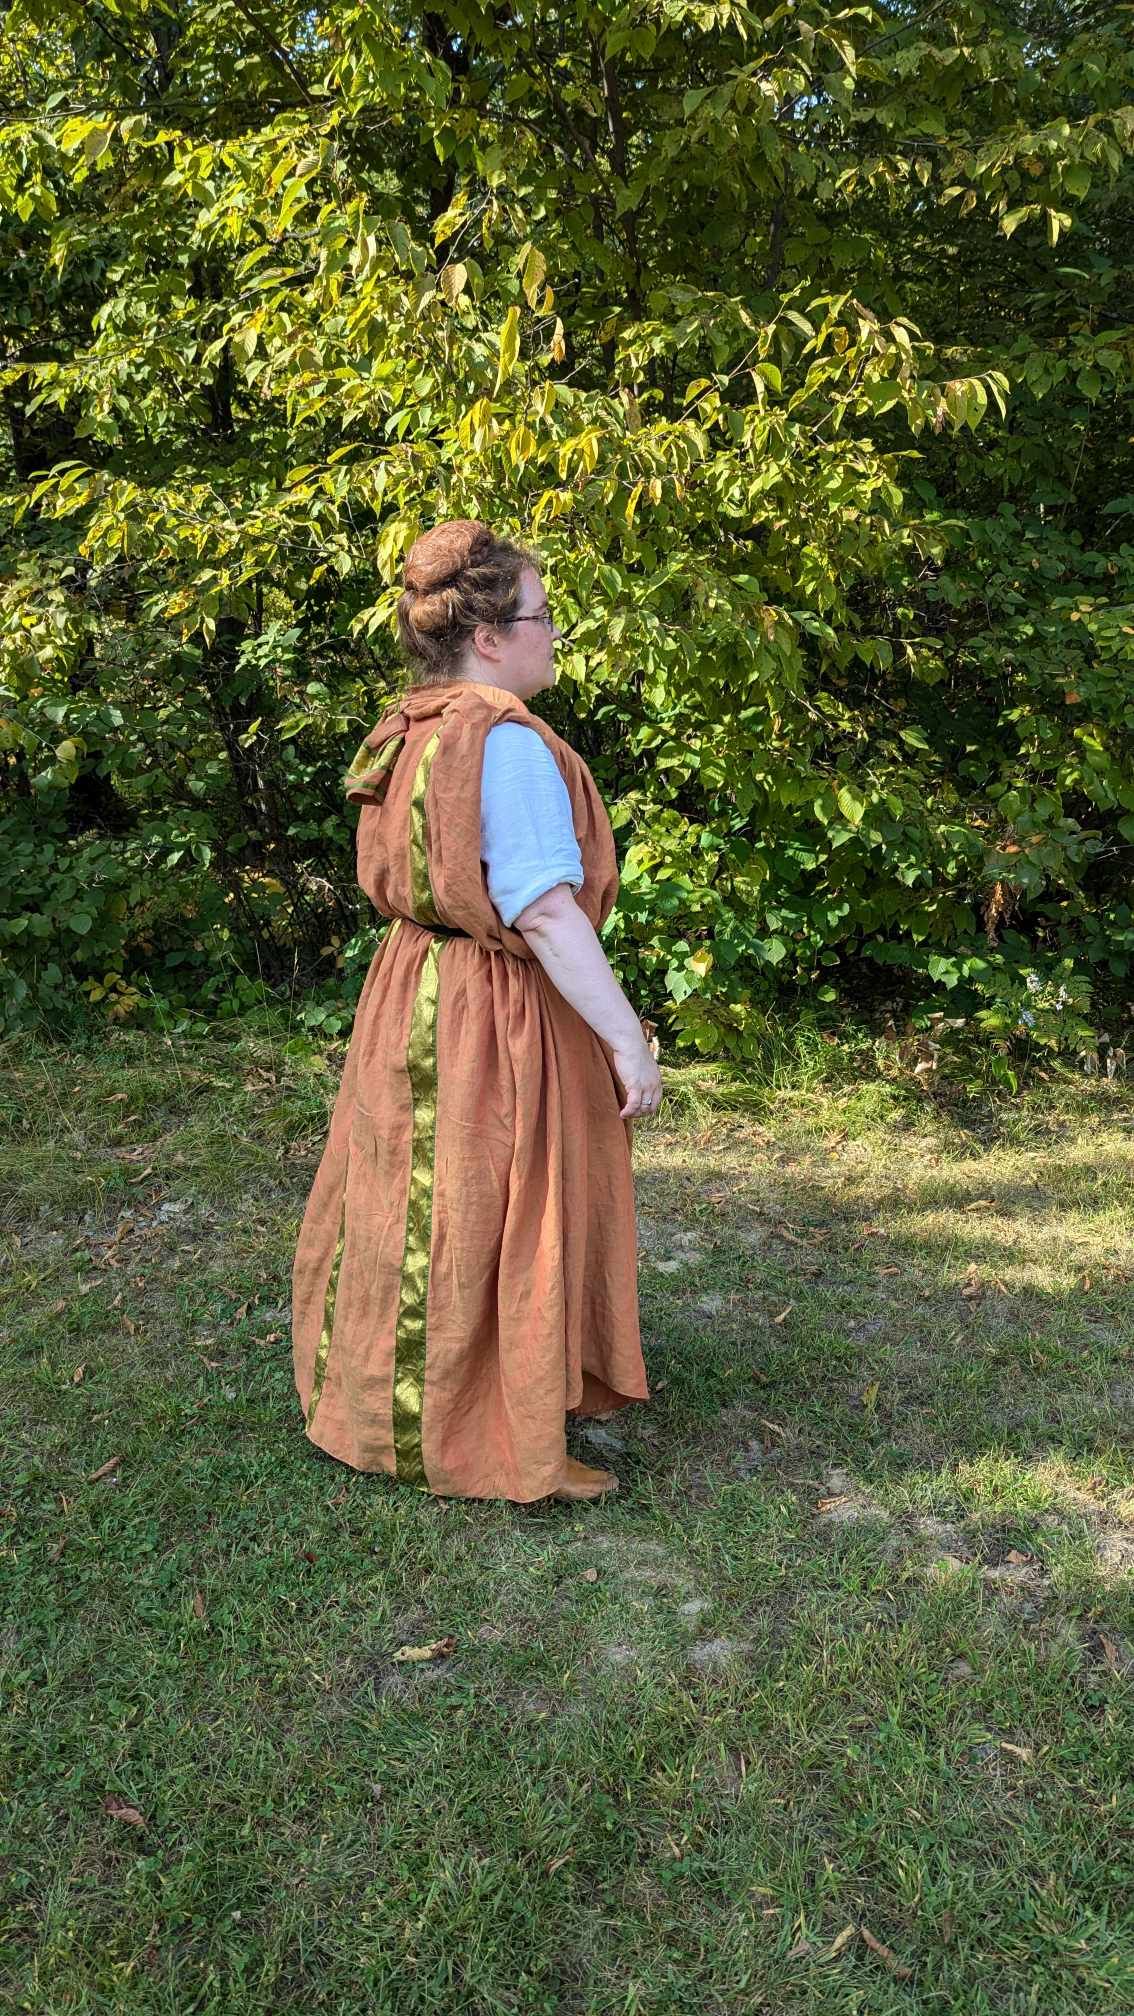
Seems to have done the trick in figuring out how these work. I have yet to make one, which always is HILARIOUS when I draw patterns and then don’t act on them, but Her Grace Duchess Petranella and Mistress Katerinka in Northshield decided to take up the challenge and give these a test run. here are some results. Kat’s garment is in orange linen, and Petranella’s is in blue wool. I love the variances in drape and what they were able to achieve with this fit. I asked Kat specifically if she could tie the sleeves up behind her back much like my midwife tunic, and she was able to do so with assistance from another. I am so grateful they were able to share these photos and their experience with me!

Video walkthrough of Sari Dalmatica/Delmatikion!

I did a thing!

Note that this is only a plausibly period approach with modern liberties. This is just a way to make good-looking, passable Byzantine garb on a budget for themed events, allow newcomers to try out a different style or persona, or make a low-cost “casual” wardrobe for when wearing fancier clothing is not appropriate (outdoor/warm weather events, wars, etc.)

This is a beginner/intermediate pattern. You will need to know how to do facings and have a basic idea of rectangular construction. You will still need a long sleeved undertunic, as well.

Pay no mind to my lack of makeup and phone acrobatics.

Byzantine patterns! THEY ARE HERE!

They aren’t scanned fabulously, but heck, you get how they work. These WILL be posted on my Eastern Roman Garb page as well, but I wanted to get these on a blog page and tagged for searchability as I plan a better layout for the current page, but this is a huge step in the content direction.

HERE GOES.

Also, let’s try to start using the Greek terms, Kamision and Delmatikion, for Tunica and Dalmatica respectively to help disseminate Greek over Latin.

Anna’s Quick n’ Dirty Byzantine Kamision (tunica) and Delmatikion (dalmatica) Patterns!

These patterns are pretty self-explanatory for folks that are used to basic medieval clothing. Byzantine garb is basically all t-tunics, with only a few minor twists. The biggest issue is really the width of your fabric allowing for the nice curved underarm seam, that’s about it. These blocks are not the be-all-end-all ways to make these garments, but rather one interpretation to show you the pieces needed. Once you get a handle on the basic construction, all that’s left is embellishment and sleeve variations.

My pattern is based off of the 7th Century tunic in the permanent collection “Under the Stairs” at the Metropolitan Museum of Art in New York City.

IMG_1882

Kamision (Tunica) instructions:

Recommended fabric: linen or very light wool
Recommended yardage: 4 yards of 60” wide

First, assess your fabric, and see if you can use this pattern layout, note the positions of the folds. This pattern is not to scale, and the average sized person may not have enough extra fabric on the sides to warrant the inclusion of the gores. This is okay, as they can be cut separately.

A breakdown of the measurements you will need as laid out in the patterns, they DO NOT include seam allowance:

A: Tunica length. Measure from the nape of your neck to where you want the tunic to end.
B: 1/4th Chest measurement + ease. Typically what I do is take a chest measurement, divide it by 2, add 2 inches, and divide again by 2. That is your number.
C: Upper arm length has everything to do with the width of your fabric and not your arm. If you can fit the length of your upper arm (shoulder to elbow) here, that’s awesome, but it’s not necessary, you will want at least to the half-way point between your joints, otherwise your underarm will not fit.
D: ½ Bicep measurement. Remember your fabric is on the fold at the top for your sleeves here, so you don’t want this to be very wide against your body. Tunicae were fitted as dalmaticae were not, so you will want to adjust ease here as necessary.
E: Lower arm length is the difference from where your upper arm length ends to your wrist.
F: ½ Wrist circumference is actually ½ the measurement you get around a closed fist. You want to get your hand into your sleeve, after all.
G: Gore length is the measurement from the top of your hip to the desired hem of the tunic. Now, if you have a fine derriere, so to speak, feel free to elongate that gore to your waist, but the original tunic’s gore comes off the hip.

tunica1

There’s a variety of formulas out there to make a neckline. I have a small neck at 13”, so my go-to cut is 4” from the center point on each side, with a 1” dip in the back and 3” dip in the front, but a 2” dip in the back and a 4” dip in the front should fit most people. A boatneck, or basically just a slit, is also a common style for this period. The tunica at the Met has a keyhole neckline with the opening on shoulder seam. I’ve done that before as well. I recommend finishing your neckline with bias tape or a narrow hem before moving on.

Before any piecing of the pattern takes place: GET YOUR EMBELLISHMENT DONE. There is no way to apply clavii to a tunica once those side seams are in place. Get any roundels or segmentae you want on as well. It’s just easier to handle at this point.

tunica2

Follow the diagram on the piecing. If you are going with the smaller gores if you were able to cut it from the folded fabric, follow the illustration at top, if you cut gores from a separate piece, follow the bottom. Apply trim over the seams where the upper sleeve joins the lower sleeve.  This is definitely something else you want to do before you sew up the side seams.

Now all that is left is to join the front to the back along the side seams, hem the sleeves and bottom, and finish trims, and you’re done!

tunica3

Delmatikion (Dalmatica) instructions:

Recommended fabric: Linen, silk, damasks/brocades, light to medium weight wool
Recommended  yardage: 5 yards of 60” wide

Think of the Dalmatica as an oversized tunica, but as the tunica can be worn by itself as one layer, the dalmatica is an overtunic only. This is a unisex garment, and sometimes for women you may see it referred to as a “gunna.” Either way, this is where you really get to jazz up your wardrobe. They can be floor length or short enough to show off your tunica embellishments.

Sleeves can be short, long, or extra-wide as was the style in the 11th and 12th centuries when my persona lived. The only real difference is that typically the dalmatica was cut from one piece of fabric, including the skirt width, whereas the tunica had gores. However, gores are still a perfectly period option in the event of a smaller bolt width. Follow the instructions as laid out above for the tunica, and you should be in good shape. As far as embellishments go, the best way to go about this is to follow some period examples.  Clavii didn’t seem as popular on dalmaticae as the centuries progressed, and richness was displayed not so much with embroidered bands of trim but rather in the heavy silk damasks and brocades that were in fashion. My drawings including clavii to better illustrate how to embellish.

dalmatica1

Note that I included a curve at the edge of the skirt portion in order to better facilitate trim application on the dalmatica’s hem. This is optional, especially if separate gores are chosen, but note that wide trims will require careful piecing and pleating to better conform to the hem.

Just like in the Tunica instructions, remember you NEED to add any embellishment such as clavii and other appliques BEFORE you close the side seams.

dalmatica3
Once your garments are completely sewn, then it’s time to go in and add all the really rich goodies to your pieces, such as hundreds of pearls and other gemstones. 🙂