A Byzanbeanie. Or rather, a kamelaukion, a small round hat that in period, could be coated with bling.
A modern hat of the same name is part of Orthodox Christian clergy attire, and looks like this:
But the look I was going for, was in part, based off of this, the Crown of Constance of Aragon. German (Not Holy. Not Roman.) Empress in the early 13th Century.
This hat is a proper Byzantine era kamelaukion from the period I prefer to represent (900-1204).
I figured it was doable in an afternoon, at least the sewing portion of it. After that, embellishment would take what it would.
The original crown is covered in filagree gold, which is well beyond my skill, and also, well, “Crown”. While I’m a baroness of the court and entitled to wear a coronet, a crown is still above my station. This means that the arches over the seams have to go, too. While they would have hid some sins, arches are symbols of imperial rulership. Constance was an empress, I am not.
I also wanted a hat that I could dress up and down, so the praipendoulia would need to be removable. Cloth was my best bet.
I decided to use some Sartor I used on a tunic of Gieffrei’s a few years back.
While I tried to preserve as much of the roundels as I could, the reality is that in period, they would have cut to conserve fabric as a whole, not necessarily the design, so I had to keep that in mind, as well. Sartor silks are EXPENSIVE, and I want to eliminate waste as much as possible. The patterns would not have matched in the 12th Century, and I needed to move beyond the modern aesthetic and remind myself of this.
The only machine stitching was on the curved structural seams. The rest is done completely by hand.
Beanie!
I lined it in bright yellow silk, and applied the same color as a bias strip around the edge to seal up the raw hem.
I found an embroidered sari trim that gave the right amount of pizazz, without looking obtrusively modern. This would be the decorative band around the brim.
But that’s not blingy enough. Time to add bezants. Yay for fitting coronet!
Clearly, the answer is more bezants, and pearls. And Amethyst for a little contrast, of course.
Time for the praipendoulia, which my husband helped me put together with amazing findings I was able to get from Etsy, brass bar we punched and filed ourselves, and chain.
Time for test fittings!
Original.
Extra Crispy.
Veil over the top for a more modest look.
And the obligatory Anna make a new hat, so time for a screamo face:
I think it really sets off my gray hoodie.
And then Birka happened, as it always does. And we flew up from Trimaris for the occasion. Here’s me in my persomanikion, with the kamelaukion and diadema (coronet), with Gieffrei and our adopted kiddo, Aethelflied, who rocks that teal sari Byzantine. Jeff and I are technically more in Siculo-Norman, as my personmanikion is based on the collar and overall shape of the Palermo Tunicella of Roger II of Sicily. Add the beanie and I may as well be a Sicilian noble, rather than a true Constantinopolitan one. I guess you can say I Normaned. Again. It makes the Norman Husband happy, at least. Plus, Siculo-Norman is just Byzantine without class, right? #notevenonce
I learned there is such a thing as “too much bling”, which is unfortunate. It’s either the praipendoulia, my hair, or my cruciform necklace. I cannot wear all three at once. I removed the necklace relatively early in the day because it was THAT bad, and then it became more manageable for me to pull my hair away from the dangly bits. But since this was worn by a Norman queen, it wouldn’t surprise me if it was worn with a thin silk veil and wimple to protect the hair from tangles. I’ll be exploring this look at a later date.
Speaking of look, nothing says “epitome of grace and nobelese oblige” like me with a can of beer in the back of court.
I field more emails and more online questions about the Varangian Guard than I do actual Byzantine personae. I lifted most of the information below from my Byzantine Personal Basics page above, but I’ve included a bibliography to hopefully help those on the path find what they’re looking for.
I’m going to preface this by saying that I have nothing against Varangian personae, but I’m about to be very blunt: Varangians are not Byzantine.
The Romans viewed them as barbarians and outsiders, and despite the fun tales from the Norse Sagas, chances are, they weren’t well liked in the City. The truth of the matter is that there are currently more Varangians in the SCA than there ever was serving an emperor at one point in time due to the fact that it gives Norse personae an excuse to wear lamellar when it’s hot (which is fine, we don’t need anybody dropping dead at war, please). Not everybody could show up at the Blachernae Palace steps from somewhere up North and demand they be admitted into service to the Purple. It was a bit more complicated than that, and each emperor had different requirements. Not to mention, Varangians were only predominantly Norse for a short period of time in the mid 11th Century if we assume what the Sagas say is true.
The first Varangian Guard was not established until the late 10th Century (around 980) when Basil II was given thousands of Kievan soldiers in exchange for marriage of a Byzantine princess to the Prince of Kiev in order to defeat the Bulgarians. The Kievan Rus were not Norse, they were Slavic, potentially with Norse ancestry, but the term “Viking” itself is a particular Norse occupation. The “Viking Age” was pretty much over at this time. We do have record of plenty of Norse travelers coming to Constantinople prior to this, but the “Viking raid” in 860 was actually Rus that had come down into the Black Sea from what is now Ukraine.
To further screw things up, the term “Varangian” itself was used by both the Romans and the Rus to refer to Norse Vikings prior to the 10th Century. So, if this is the route you desire to go, determining if you’re just a Norse traveler from early period, or an actual member of the Emperor’s elite guard is important.
If you do decide to go Varangian GUARD, here is a list of “waves” of ethnicities that served at specific times. This is by no means set in stone, but it provides a guide for those that want to pinpoint a specific time period that suits their goals:
988 – 1020ish: Kievan Rus
1020-1070ish: Scandinavian (Icelandic, Norwegian, Swedish) Bolli Bollason and Harald Hardrada served at this time.
1070-1204ish: Danish and English (Anglo-Saxon). The term “Danes” comes up in Byzantine literature often to describe the Varangians, and the English were escaping Norman rule in England at this time. This is documented in the saga of Edward the Confessor. Siward Barn served at this time. Normans were NOT permitted to be apart of the Varangian Guard, but some may have served as mercenaries in other capacities.
The Fourth Crusade has probably some of the best documented accounts of the Varangian Guard in action protecting Constantinople. After the retaking of Constantinople and re-establishing the empire, however, there didn’t appear to be as formal of a guard unit, and those that were a part of it, had fully assimilated into the Roman culture. It is unclear if the Varangian Guard really remained a thing until the Fall of Constantinople in 1453.
There are a lot of myths surrounded what they actually wore, especially in the SCA. The “red is for the Emperor’s service” and “green is for the Empress’s service” is totally a SCAdianism as far as I’ve found. It looks like the on-duty color for the guard was blue or red, while off-duty, you see them in nothing more than plain tunics and slim-fitting trousers or hose, which was typical for men’s casual wear throughout the empire. Earlier travelers would have continued to wear the clothing of their culture, versus picking up stuff along the way. Clothing was expensive and difficult to carry and launder, so the other SCAdianism of having a diverse wardrobe boasting the latest fashions of every exotic port of call you visited is also inaccurate. They would, however, assimilate over time if they decided to stay put in an area. This does not include trade goods, but items that were exchanged in business were not necessarily the same as the clothes you wore on your back.
As far as religion goes, during the period of the active guard, most serving were already Christian, or converted to Orthodoxy from a later, heavily modified and somewhat hodgepodged version of Arian Christianity which was more common in Eastern Europe and the Scandinavian countries very early before the Western Church started coming in with missions. Please, remember that Arianism IS NOT THE SAME THING as Aryanism. Mind your i’s and y’s! Either way, the idea of your persona dripping in lovely Asatru regalia would be incorrect as a guardsman, but as a very early Norse traveler to Constantinople, still possible.
I totally just ganked these images off of Wikipedia since I know they’re there, but you can check out the Madrid Skylitzes here: https://www.wdl.org/en/item/10625/
“On Duty” Varangian Guardsmen in the gold armor with blue garments beneath. They are armed with rhomphaioi (axes), and shields. Note the round and teardrop shields. From the Madrid Skylitzes, 12th Century.
A woman kills her Varangian would-be rapist, and then is presented with his belongings from the other guardsmen. Note how they don’t look very “Norse” or Scandinavian – Dark hair and eyes, probably Eastern European, though at the time the manuscript was produced, they would have been mostly English (Anglo-Saxon). Plain tunics and slim-fitting trousers with boots- Typical of a Byzantine common man instead of a fancy hodgepodge of Norse and Byzantine that is common in the SCA. Also from the Madrid Skylitzes.
And for those that want to actually do homework, here are the goods:
Suggested Readings
Primary Sources
Of Aguilers, Raymond. Historia Francorum Qui Ceperint Jerusalem. Translated by John H, and
Laurita L. Hill. Philadelphia: American Philosophical Society. 1968; Medieval
Sourcebook, 1997. http://www.fordham.edu/halsall/source/raymond-cde.asp
Choniates, Niketas. O City of Byzantium. Translated by Harry J. Magoulas. Detroit: Wayne State
University Press. 1984.
de Clari, Robert. The Conquest of Constantinople. Translated by Edgar Holmes McNeal.
New York: Columbia University Press. 2005.
of Edessa, Matthew. The Chronicle of Matthew of Edessa. Translated by Ara Edmond
Dostourian. Ann Arbor: University Microfilms. 1972.
Komnene, Anna. The Alexiad. Translated by E.R.A. Sewter. London: Penguin Books. 2009.
The Laxdaela Saga. Translated by Muriel Press. London: The Temple Classics, 1899. The Online Medieval and Classical Library, 1996. http://www.omacl.org/laxdaela/
Porphyrogénnētos, Constantine. De Admininstrando Imperio. Translated by R.J.H. Jenkins.
Budapest: Pázmány Péter Tudományegyetemi Görög Filológiai Intézet. 1949-1962.
——. De Ceremonii. Translated by Ann Moffatt and Maxeme Tall. Canberra: Byzantina
Australiensia. 2012.
Sturleson, Snorri. Heimskringla (Saga of the Kings.) Translated by Samuel Laing. London: 1844; The Online Medieval and Classical Library, 1996. http://omacl.org/Heimskringla/
de Villehardouin, Geoffrey. Chronicle of The Fourth Crusade and The Conquest of
Constantinople. Translated by Frank T. Marzials. London: J. M. Dent. 1908; Medieval
Sourcebook, 1996. http://www.fordham.edu/halsall/basis/villehardouin.asp
Books and Articles
Blöndal, Sigfús. The Varangians of Byzantium. Translated by Benedikt S. Benedikz. Cambridge: Cambridge University Press. 1978.
D’Amato, Raffaele. The Varangian Guard: 988-1453. Oxford: Osprey Publishing. 2010.
Madden, Thomas F. The New Concise History of the Crusades. Lanham: Rowman and Littlefield. 2006.
Norwich, John Julius. Byzantium:The Decline and Fall. New York: Knopf. 1995.
Queller, Donald E. and Thomas F. Madden. The Fourth Crusade: The Conquest of Constantinople. Philadelphia: University of Pennsylvania Press. 1999.
Runciman, Steven. A History of the Crusades. 3 vols. Cambridge: Cambridge University Press. 1987.
Dawkins, R.M. “The Later History of the Varangian Guard: Some Notes.” The Journal of
Roman Studies Parts 1 and 2. 1947. http://www.jstor.org/stable/298453.
Shepard, Jonathan. “The English and Byzantium: A Study of Their Role in the Byzantine Army During the Later Eleventh Century.” Traditio Vol. 29 (1973): 53-92. http://www.jstor.org/stable/27830955.
I do wear Norman garb, too, even if I don’t like to admit it. It’s one of those “well, I’m married to one, so I need to look the part sometimes” gigs, much like how he also owns Byzantine garb, to humor me. This post is to help start build content for my Norman Garb Basics page I hope to finish after Pennsic.
My first bliaut I talked about here on this blog, in the chronicles of the Norman longdress. Here and Here.
That one was not without issues. It didn’t fit the best, I back engineered the lacing, and the elongated torso does no favors in linen. I have since parted with this dress to someone who could wear it better.
My second bliaut was easy. It’s an earlier design: no side lacing, and a looser, skimming fit versus a tight, completely form-fitting one. A simple keyhole neckline, made of basketwoven wool. It has a nice drape and I like the fit. It’s more accurate to my husband’s timeline of the late 11th Century if I use similar cuts seen in the Bayeux Tapestry as an example. I am unsure if the lining was ever really contrasting, but I like the way the blue just punches out of this one. I guess this could be considered more of a proto-bliaut.
Figuring the experience of these two dresses combined, I could make a late-12th Century version, with the lacing, and the slit neck, and the pendant-style maunche sleeves, and rock it for the William Marshal Tourney at Pennsic as Jeff’s consort.
HAHAHAHAHAHAHAHAHAHAHAHAHAHAHAAHAHA. no.
I will say all of my mistakes could have been avoided by ACTUALLY MAKING A MOCKUP AND PROPERLY PATTERNING THE DAMN THING instead of what became another back-engineering project. The hilarious thing is by this point, I can help people figure this pattern out just fine with good results. I guess it’s a good thing that this particular style is too late for Gieffrei and myself, and I just made it with Pennsic in mind, so I didn’t spend the amount of time I normally would lining sleeves.
It started off easy enough. I make my bliaut pattern with a front and back seam, so I sew together 4 pieces for the body. This allows me to put in back and front gores with minimal fuss, and also helps get a clean neckline. I figured this would work great for the slit neck versus cutting the fabric, and draped it as such.
I applied the trim to the neckline at this point. The V comes down to mid bust. The back opens just below my first vertibrae. I found a vintage sari trim that looks wonderfully Siculo-Norman.
From here on, it went together pretty smooth, except that I cut the gores a bit too long. That was an easy fix, albeit a frustrating one. I was just careful to line up the front and back seams at the trim when I inserted the gores. Easy enough with a liberal dose of pins.
Much like constructing a regular t-tunic dress, it went together, and sat on my dress form like a lifeless sack with pretty trim.
The hard part was the fitting. I don’t know many people yet in my area, so having a friend to come over and actually fit this sucker was out of the question, so my husband helped. I put a gusset in the underarm out of habit, thinking that the sleeve would be okay, it was not. So he pinned and marked what would need to be taken in.
Oops. Either he got too excited, or I did. Crap. The sleeves were too tight! I tried it on with an underdress, and split the seam, so I knew this was going to be a tough fix. I could either insert a new gusset that would close the seam, or just lace it up to where it needed to be. To make matters worse, one sleeve was tighter than the other. I got way too scissors happy. @#$%!
When I spoke at the conference at Fordham in March, there was a session given by Gale Owen Crocker about extent garments and fit. We have a very symmetrical view on clothing in the modern period as a result of mass produced garments. The Middle Ages had no such sense. Clothing was tailored to the person, mistakes were worked around. Fabric was precious and so was sewing time. We’re spoiled with mechanization, and forget the “make it fit” view of the period we’re supposed to be representing. Well, considering I had no extra fabric to make new sleeves, I had to make this work.
The custom gussets were not working out well. I went from triangles to footballs to leaves to giving up. Laces it was going to be.
I measured out 16 eyelets on each panel, for a nice total of 64. I started marking them out, and my husband went, “Uh, you’re going to machine those, right?”
He had a valid point. While machine eyelets are not the best for fabric, handmade ones would take me far too long and far more stress I didn’t need. Machine it would be. Fortunately, my machine does a reasonable job.
Full sleeve and side opening.Adequate machine eyelets.
Despite it being by machine, these are not that fast, and not without error. I actually ran out of bobbin thread in the middle of a row, in the middle of an eyelet, which was the only way Jeff got me downstairs for dinner. NY Strips on the grill, and I still wasn’t going to leave the machine.
After about 12 hours of work spread out over 4 days (I was getting punchy), I finished it. I was hoping I could use one of my existing underdresses, but I don’t have a white one that is slim enough so…more sewing for me! @_________@ I do need to weave a wider belt and will probably do that on-site at Pennsic, since I’m pretty fast with inkle, and can get nice materials from the merchants. The one I used here is handwoven trim I made last year. I’m thinking it may look nice as the trim on the underdress.
Observations:
Make a freaking mockup, you lazy bint!
Linen is still not as good for a bliaut as wool, but Pennsic is death.
Triple check your husband’s work, and you know, make a mockup.
Not a fan of the slit neck as much as the keyhole. because of the way it effects the fit on top.
Really not a fan of the lacing, and I don’t think my next one (parti-heraldic for Crown tourney) is going to have them.
After Pennsic, I’ll be posting my pattern for my bliaut block in the Norman Garb page.
[Yes, the woman who named her site after a VNV Nation song just dropped a Wu Tang reference. Not even sorry.]
My husband has a huge head and a normal neck. Those of us who sew know what this means, it means a gaping maw of a neckline that shows off the Norman’s delicate ginger skin. And while it’s nothing a nice brooch and a gallon of sunblock can’t fix, it’s not -right-.
I’ll be posting soonish on dressing my husband in Byzantine, (yes, really, men’s garb, you heard it hear first), as well as including a new page on Norman Garb here on my site (*faints*) but I needed to reassess my approach toward fit.
During my short time in Caid, I had a discussion with a friend about necklines. American reenactors and re-creators make our necklines too big. After her visit to Scandinavia and meeting with Viking reenactors in the land of Where This Stuff Actually Happened, she gave me some tips on how to fix my stupidity.
I’m sure that this technique is known to a few people and I’m going to get a “WELL, DUH!” Gibbs Slap in the comments, but knowing also that there’s some derpy sewers out there who probably make the same mistakes I do, this post is important.
For the longest time, I’ve been following a formula given to me a while ago: You draw your neckline 3-4″ each way from the center point, 2″ down in the back, 4″ down in the front, and add a keyhole slit. This gives a lopsided oval effect with a shorter back than front, which is essential for comfort, but it’s just too wide around the neck. My husband’s head is 26″, his neck is 17″. He’s not a jacked guy, but he’s tall and broad, so making garb that doesn’t choke him has been a challenge.
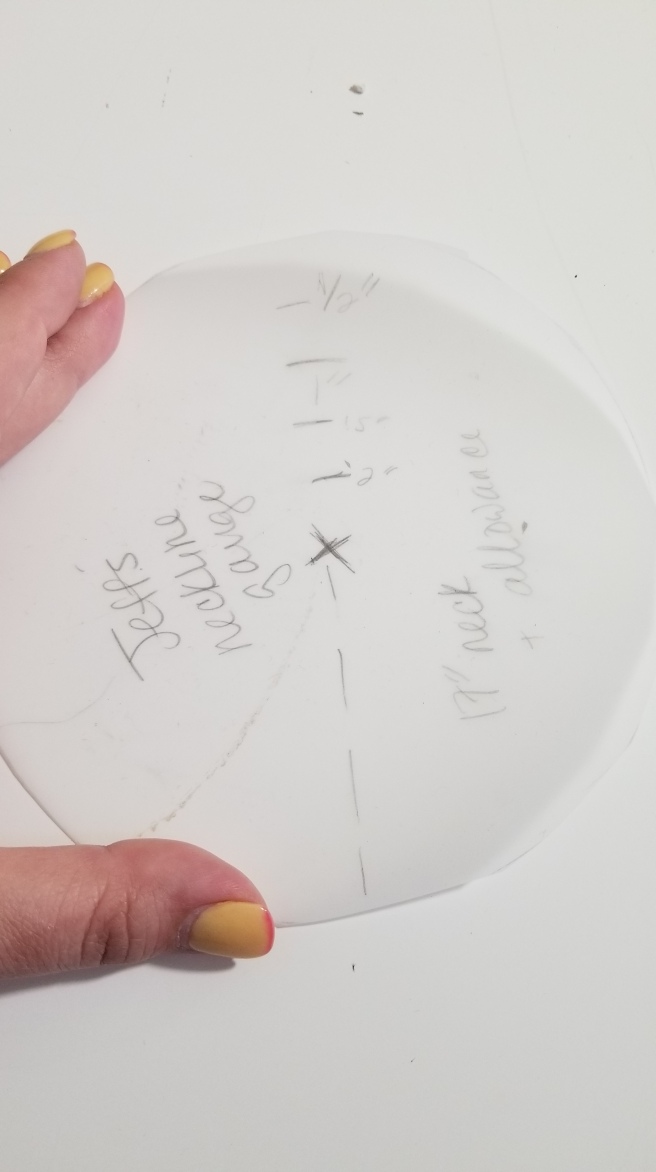
Here is my new hack: Neckline gauges.
A true circle with the circumference of our necklines (13.5″ for me, 17″ for him), marked up showing increments of 1/2″ from the back toward the center mark. Ignore where it says “+ allowance”, I tried that and it made it too big. Just go with the regular neck measurement, the hem or facing will take care of that ease.
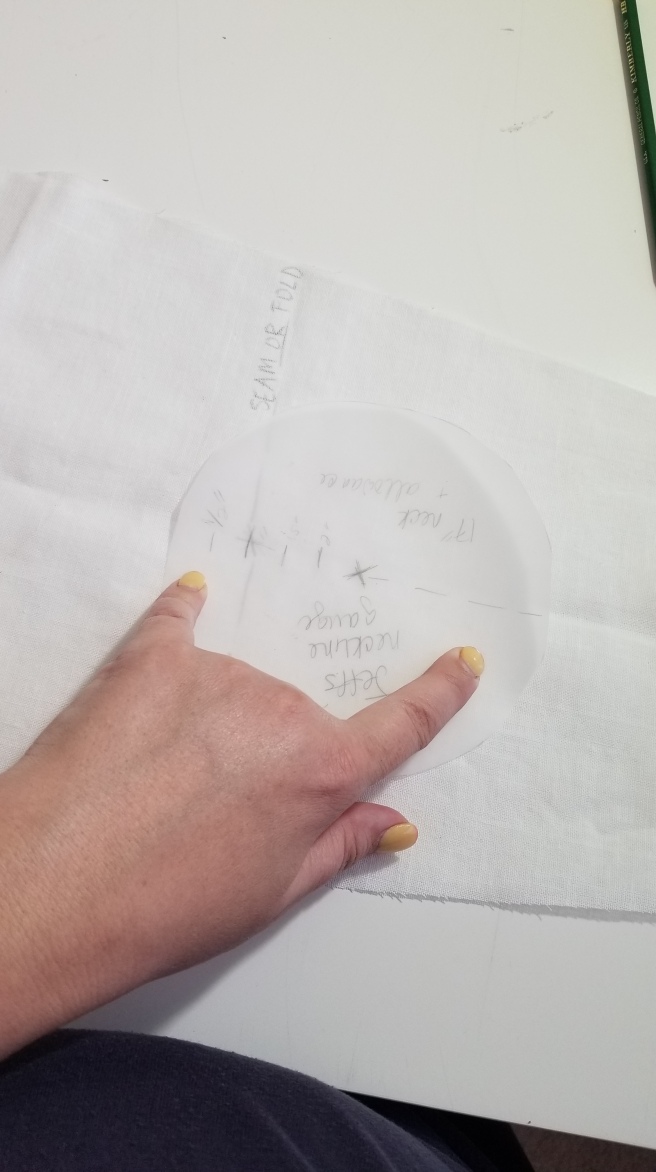
You place the gauge on the fabric, center mark matching to the dead center of where you want the neckline to be. Then, move it forward to where you want the depth of the back to be. I’ve done both 1″ and 1.5″ with good results. The dotted line helps you maintain the angle toward the front, and where you can mark your slit.
Here I am demonstrating it on a piece of scrap linen:
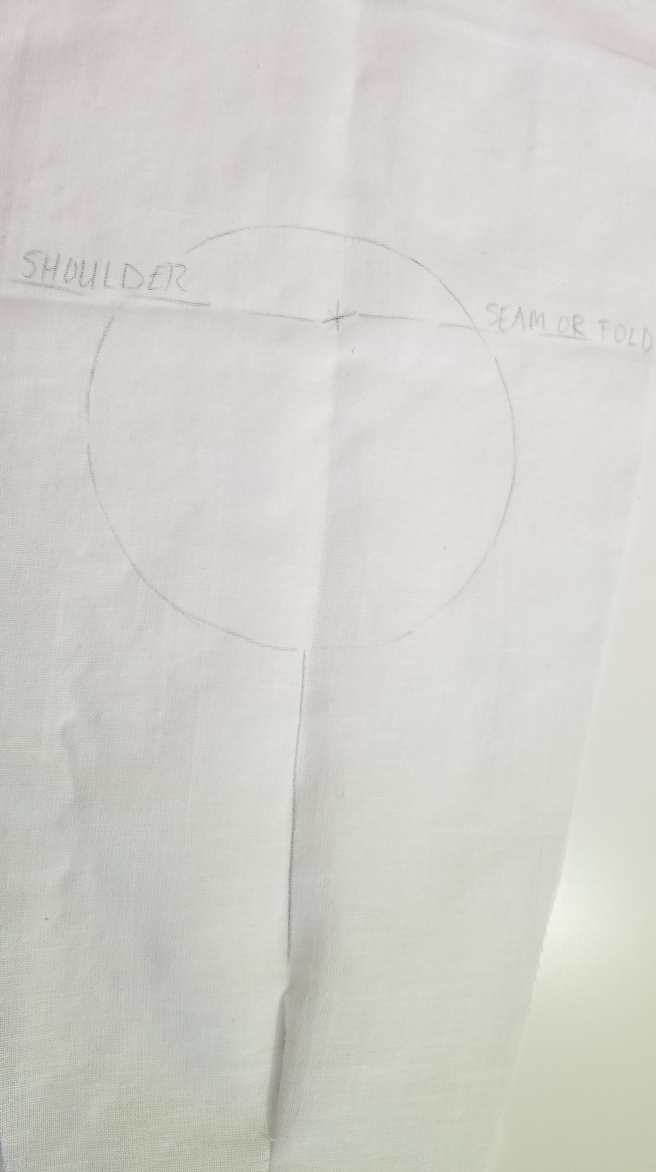
White on white was a horrible idea, but let’s pretend that fold in the scrap is our shoulder seam or fold.Place the gauge on the fabric, matching center points.Move it forward to how deep you want the neck to be. In this case, I’m leaving 1″ in the back, so I’m putting my 1″ mark over the center mark.Trace, and cut.
Give that a shot. Practice on a scrap and put it over your head. You should have a neckline that comes right up if not a bit above the clavicle, and looks more accurate. Voila!!
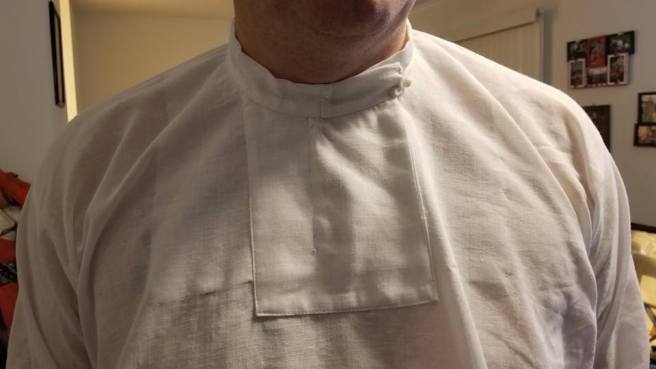
Clearly, a closed slit is vital to the tight necks in Byzantine artwork, but you never see the slit! What do we do?
I’ve constructed this for my husband with great results, both with, and without the band collar. This is also where I learned to NOT ADD A SEAM ALLOWANCE ON THE NECKLINE. I’ll be posting a better walkthrough once I’m done with his new collection of tunics so I can discuss my experience using the pattern above.
The other option is to put the slit off-center. The most common is just down the left side of the neck, as seen in the Alb of the Holy Roman Empire, and the Palermo Tunicella. While both not “Byzantine” garments, the Eastern influence is evident.
The Coronation Alb of the Holy Roman Empire. The left slit is closed with fingerloop braid. Click on this to see the larger image, it’s worth it.The Palermo Tunicella, with the deep slit off left on the neckline, surrounded by a band of brocaded trim.
So the next time you’re at a loss, looking at source artwork and wondering why your necks don’t look right, give this idea a shot and try a variation for a new fit. I know I’ve been totally converted.
So I’m currently in the lead over at Fabrics-store.com’s Reenactment and Costume Contest, which is sort of funny, because I had to get my arm twisted to enter anyway. It’s even funnier than it’s our Norman garb, but I digress, I could use some votes to stay on top!
It’s simple! Just make an account (free!) and vote once every 24 hours for the next 2 days. The store doesn’t spam you with emails, and you can toggle that once you have an account. I would also appreciate a share or two on social media if you can spare the milliseconds and bandwidth.
This is what happens when I catch a cold, miss an event, and decide to not do homework. When I’m sick, I get bored, and when I’m bored and hopped up on cold medicine, well…I needed to tinker.
Edited on 9-28-2015 to add finished pictures.
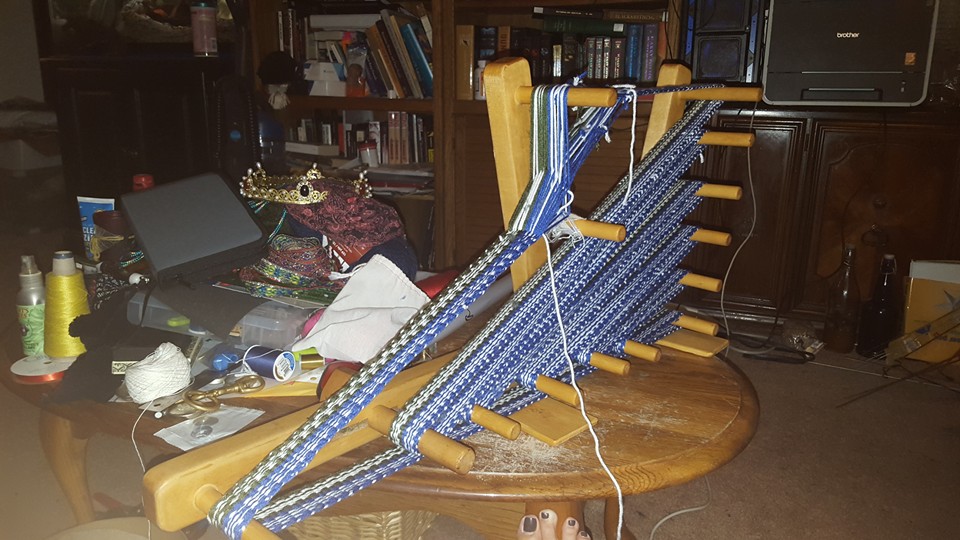
PROJECT ONE: WEAVING THINGS.
Well, I started by warping up the inkle loom and making the Norman husband a pair of leg wrappings in his heraldic colors. They’re pretty crappy in some places, and hence, leg wrappings, rather than trim. This is the first full 6 yard band I’ve ever made! Material is acrylic yarn, because I wanted them thick,washable, and low-cost in case of it turning into a cat toy. I did okay though, so now I’m more confident in trying wool yarns for the next batch. I finished this in a day. I warped it Saturday night and by Sunday night the band was complete. I was a MACHINE.
The pattern when I hit my stride.
FULL LOOM! And a coffee table full of craft supplies.
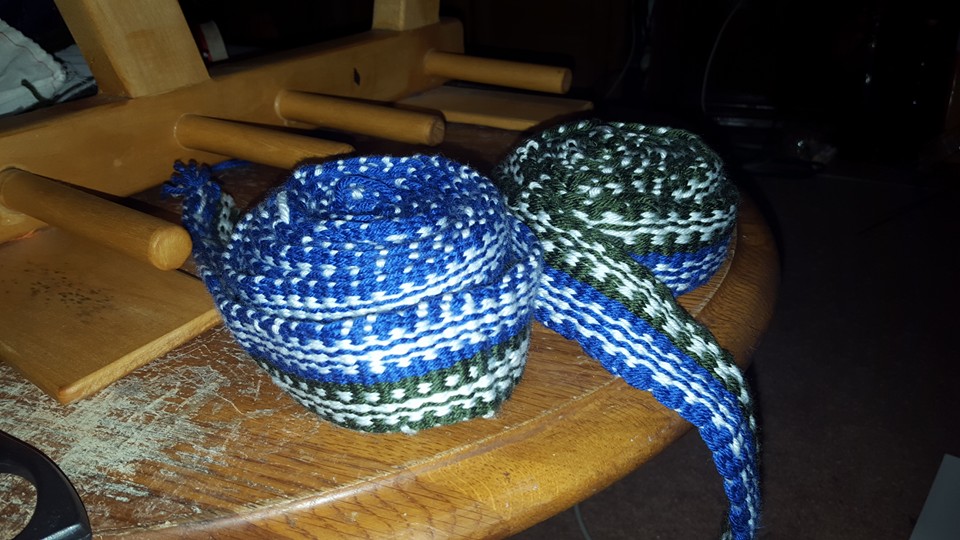
BOOM! A pair of leg wraps at 3 yards each, about 2.5″ wide.
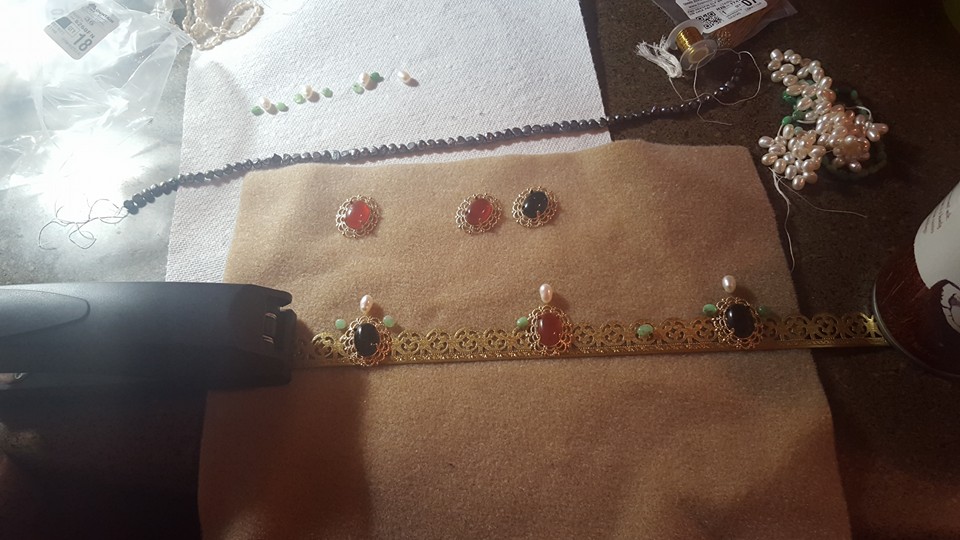
PROJECT TWO: SHINY THINGS.
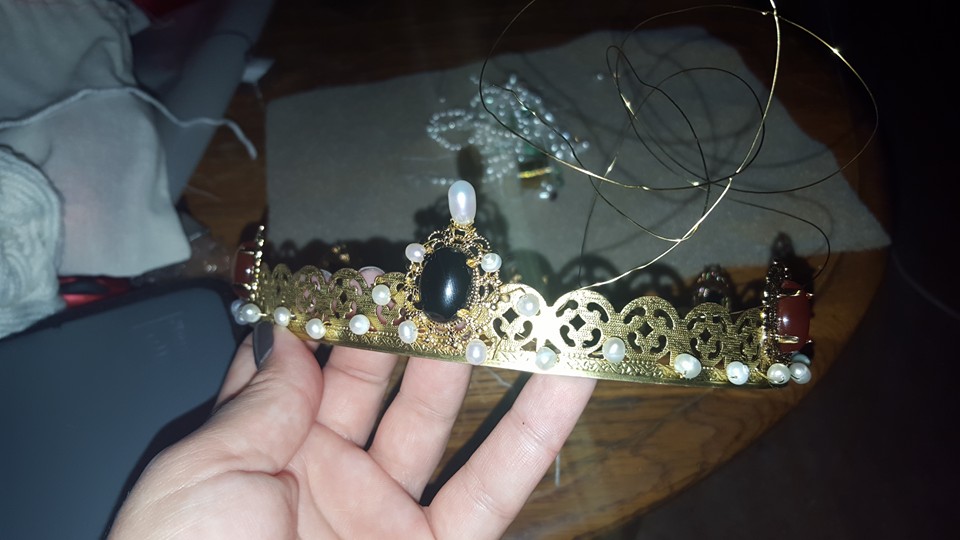
Oh yeah, see that coronet on the table? I made that too. Norman Husband challenged me to make a coronet with him out playing Navy. Him not around left with me NO METALWORKING SUPPLIES. So, I had to play, and go buy a new beading pliers set. And JB Weld. I could NOT have done this without clear 2-part epoxy. G-S Hypo Cement did not cut it except for gluing the band itself together and the cabochons onto the settings. It did not hold the settings onto the band. I’m still not 100% finished with it, when I am I’ll post finished pics.
I set up a “coronet bar” on my kitchen counter, because it’s high enough for me to not hunch, and I have great lighting. Findings are just some vintage brass lamp banding and shiny bits from Fire Mountain. Stones are real carnelian and onyx, and pearls. Lots and lots of freshwater pearls. Not only very period, but also my heraldic colors.
Epoxying the cabs on the band.
It didn’t look so bad the way it was, but you know, Byzantine…
Lotsa Byzantine. I’m just attaching the pearls by weaving wire through openings in the brass.
I marathoned the original Star Wars Trilogy while I worked on this. It gives you an idea of how long it took. Here it is almost done with some Darth Vader.
Here it is on my head. I think the top pearls make it look too Western (boo hiss), so I’m going to cut them off, and replace them with round pearls. I could have gone WAY OVER THE TOP with this, and wanted to, but I was talked out of it, and I’m glad.
I added rings on each side near my temples for a pair of pendilla to hang from. I don’t have the pendilla made yet, and I don’t ALWAYS have to wear them.
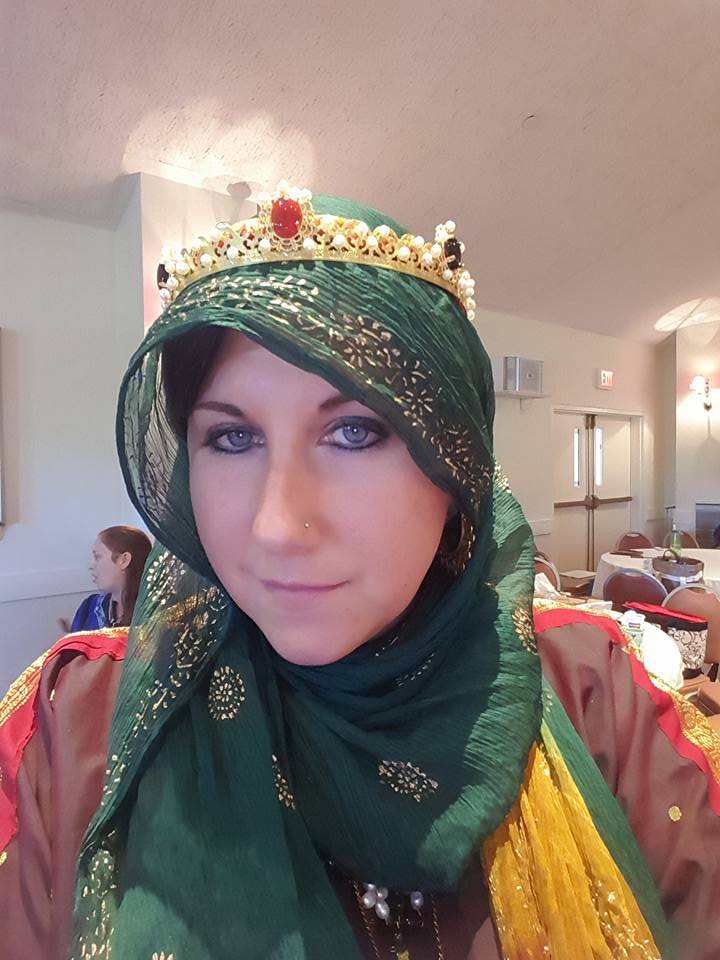
Finished coronet as of one week after I made it, after removing the top pearls, replacing them with smaller ones, and lining it with orange velvet:
Notes after wearing for an event: Too much padding, it didn’t want to stay put. I know coronets are jewelry and not a headband, but still. I’m going to try a different method before I wear it next. Also, I got a lot of compliments on my veil. All it is, is a green/yellow/red ombre dyed Indian dupatta. It still smells like batik. I wrapped it and tucked it into my belt in the front based on some icons and manuscripts I’ve seen.
No, using vintage lamp brass and epoxy aren’t exactly period techniques, but it creates the illusion for now until Norman Husband completes the Hagia Sophia of Coronets he’s promising me. Plus, this is dainty and clocking in at 1 3/4″ at the tallest, so it works for periods I wear that AREN’T Byzantine. I’m not a jeweler, and especially not a hat maker, so even three days later my hands are KILLING ME.
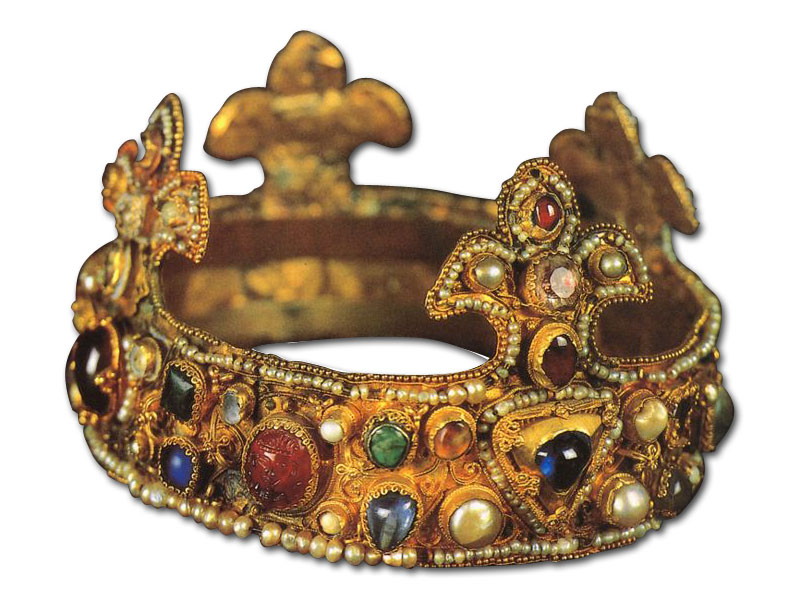
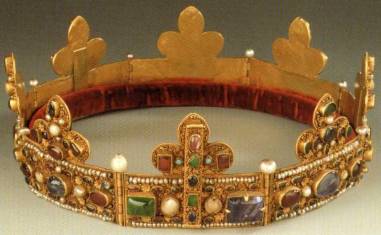
Here’s a couple of Byzantine crowns that I pulled some [vague] inspiration from. They didn’t always wear votive crowns and massive tall hinged plaque things of doom.
PROJECT THREE: MODIFYING THINGS.
And last but not least, OMG SHOES.
If you read my previous post, I made a blurb about what color shoes are appropriate for a Byzantine persona. As a court baroness, I could get away with yellow, so, I wanted to see if I could invest in a pair of proper Eastern looking shoes. Unfortunately, most medieval cordwainers don’t make Byzantine or Middle Eastern shoes (that’s a hint, folks) so I had to improvise. I hate HATE HATE wearing Pakistani/Indian Khussa, because they eat my feet alive. Even if I shower with them on, or wet my feet, they just never break in, and rip me up. That’s no fun. So some searches yielded Moroccan Babouches. These are actually pretty perfect, except that they’re backless. Now, extant mules have been found, and are still worn in Turkey today, but I hate backless shoes, mostly because as you can see in these pics, my feet and ankles are very narrow. It makes mundane boot shopping a crappy experience when the material just pools around my ankles.
I found these super awesome embroidered babouches on Etsy. They look very…Calontir.
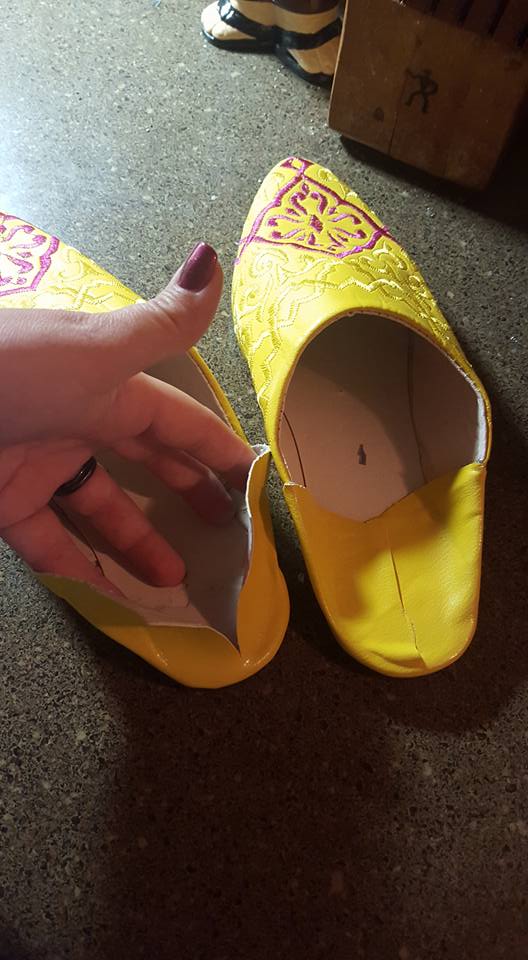
I ripped the backs up to find that they’re designed in a way that you cannot fit your foot in comfortably, so, I split them down the back.
Cut holes with scissors on cutting board, because husband brought leather tools with him while playing Navy. Find random leather strap in his leftover stuff, and lace.
Experiment with lacing.
Walk around and immediately get blister.
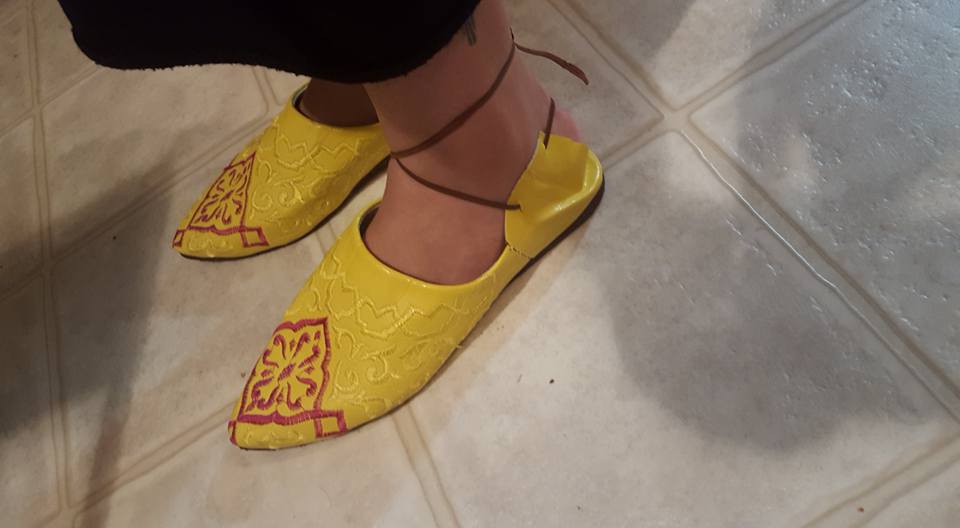
Tie them in the front. Ah, that’s better.
Side view, they don’t look horrible. However, taking pics of your own feet is kind of tricky.
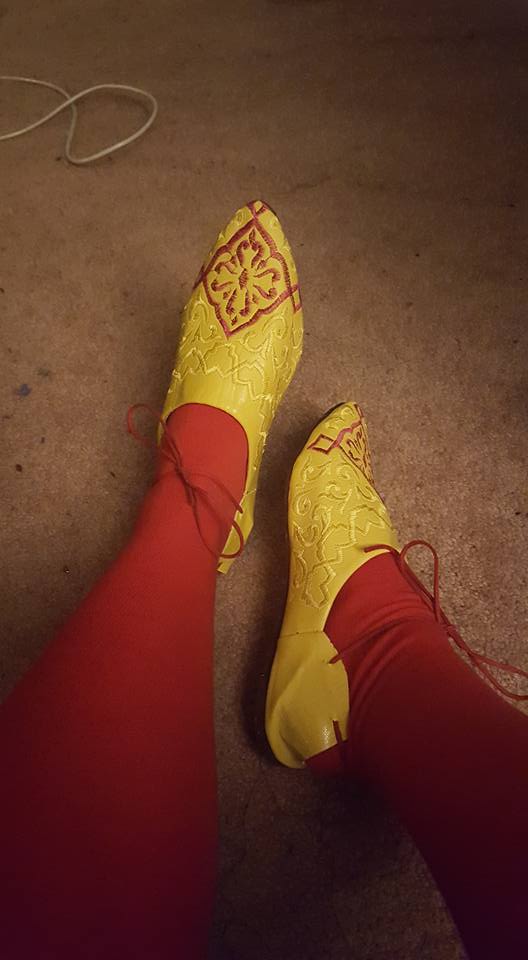
Shoes with better lacing and my red stockings:
I just felt so damn sassy.
Period shoes that gave me this horrible idea:
We called these the “Byzantine Chuck Taylors” on Facebook. No, the backs aren’t open. I know. I know. I IMPROVISED, OKAY?
A pair of Byzantine Mules dated to 300-700 from Panopolis. Here’s that backless option for those that aren’t afraid of flat tires and don’t have feet that fall out of everything like I do.
The ones I made are clearly going to be “inside event” shoes. I’ll wear them with stockings in hopes to combat some of that extra width while the lacing will stop my feet from falling out. The best part that is if I want to, I can pull the lacing out of my shoes and flatten the backs again into mules.
Again, like the coronet, I’m creating an illusion from modern materials. Once I’m done with my master’s degree and move across the country, I’ll have time to work on making an actual pair of period leather shoes with gold leafing that WON’T be too wide for my feet and involve kitchen surgery. And maybe I’ll learn some metalworking so I can help my husband in making a proper hinged 11th Century coronet, but until then, it doesn’t hurt to use your imagination in the little game we play.
I need to confess that I name my nice garb. I do. If it hangs up in the closet and doesn’t get balled up and thrown in a tub for camping season, it has a name.
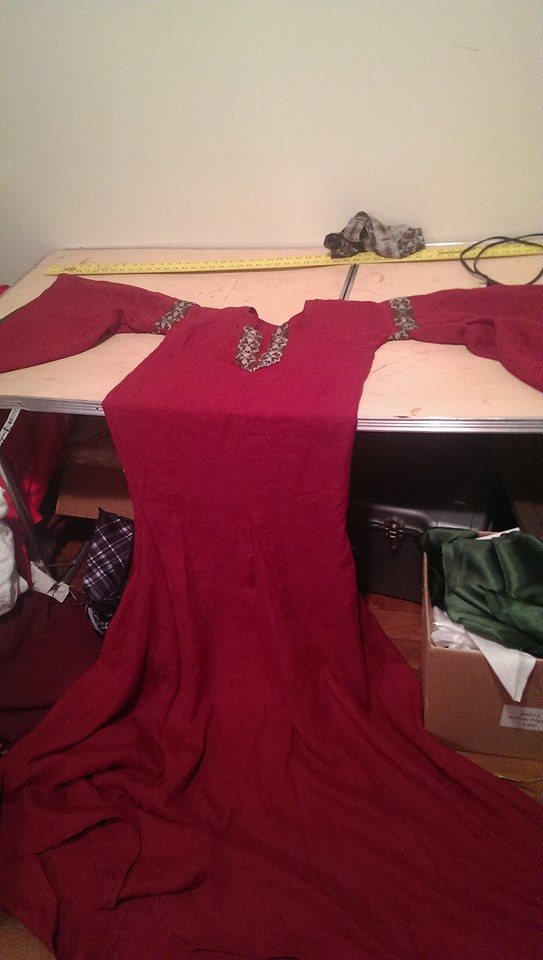
For example, my heavily pearled gold delmatikion is my Dalek Dress. I didn’t name it that, but it stuck, and I certainly did want to exterminate all the things by the time I was finished beading it the first time around. My Turkish fencing coat is the Portuguese Whirling Dervish, because of the colors, and my Buccaneers-inspired Elizabethan from last Birka is the Traffic Cone. My burgundy bliaut is the Norman Longdress, because long dress is long. Much like the longcat of internet yore.
Longcat is Long.
I didn’t fix it last year after I wore it to Smoking Rocks Baronial Investiture, and it’s been sitting in my closet since. Not that anything was terribly wrong with it, but I didn’t have a lacing up one side to create the ruching effect that Norman women found ever-so-sexy. So I simply made the dress tighter, and hoped for the best. It worked, but not that well.
Since the local 12th Night event that I attend in the Barony of Smoking Rocks is usually 11th Century Norman and/or Saxon, I figured that’s where I would get the most bang for my buck with this floor dragger. I didn’t wear it last year since we did a murder mystery in which Anna as a Byzantine needed to be present, so this year, I FINALLY get to wear it again. Time to get the lacings in.
Fortunately for myself, I had some sort of plan when I sewed the thing, and left the side seams unfinished so I could pop one for the lacings. This made me more happy that it probably should have. So I split the right side of the dress from the upper arm to the hip, hemmed it, and got to play with my machine’s buttonhole function 41 times. In theory and practice, yes, I should be doing eyelets by hand, but I assure you all that my machine does a way better job than I can do, and in a quarter of the time. Cheating? Yeah, probably. Utilitarian? Very yes.
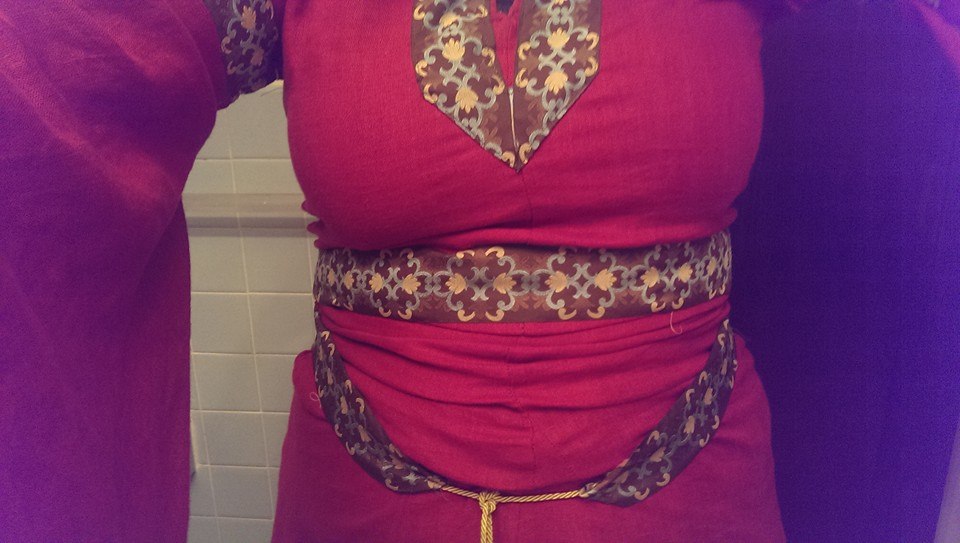
So here’s the first look, before I put on the girdle. You can see how the lacing (spiraled, I should mention that) draws up the length of the dress to create the desired wrinkles. The “I’m so important I can afford extra fabric to just wrinkle around mah belly” look.
And here’s with the girdle, which after doing the requisite dancing around the house, is necessary. The design is not only decorative, but it holds the ruching in place in the front. Otherwise, you’re going to walk on your dress and faceplant. I wonder how many Norman women fell down the stairs before they figured this one out.
My husband didn’t even pull it as tight as it could go. I wonder if we really yanked it around my chest if it would draw up the fabric more. The torso is approximately a foot longer than my own to allow for this extra gathering. My underdress is tailored normally. Each have 4 gores instead of just on the sides to allow for very full skirting. It is HEAVY, and when I spin around I feel like a princess, and then try not to fall.
I do think that the bliaut itself would be far more beneficial in wool than linen. I can’t afford that much dress-weight wool right now, but the stretching and conforming to a shape with body heat versus the less pliability of linen would make a HUGE difference. So those reading this post to get ideas, I would recommend that if you can swing it. If not, linen is a perfectly fine choice.
I’m hoping to finally get REAL pictures of me in this dress next to my Lord in his Norman. So we’re finally in the same time period at the same time. Once I eventually make him real Byzantine on par with my own instead of the one tunic he occasionally wears when I order him to, we can have a set of good photos for things such as holiday cards, and gifts for our families who think us terribly weird. 😀
I’m sure readers are wondering why a woman, who is normally focused on the clothing of Rome and Byzantium, is now making Norman garb. Well, for one, I’ve wanted one for a long time. For twos, my persona is half-Norman. My boyfriend is Norman, and the freehold I am apart of is a Norman keep. So…it was only a matter of time before I made Norman garb for myself. My friends in the neighboring barony are being invested as baron and baroness this coming weekend, and they are Saxon. So, what could be funnier than all of their pals showing up as Normans to the party? Our area 12th Night event is also very early 12th century and traditionally a 10 foot rule event, so I needed to make something appropriate for that, also. The only hitch was that I’m 11th Century, 1090s to be exact, so I had to find evidence to support the wearing of this garment in that period. That was relatively easy, as the Bayeux Tapestry clearly shows women wearing snug dresses with droopy sleeves. Tada!
Queen Aelfgyva says, “Whatevs.”
I found the spot of evidence I needed from Sarah Doyle’s Page on The Clothing of Norman Women in the Late 11th and Early 12th Centuries. She gives a wealth of sources that made it easy to get an idea of the style I wanted to make, as bliauts can vary quite a bit. I wanted to keep it relatively simple with sleeves a reasonable length such as Aelfgyva’s above, and line then to show contrast as what seemed popular during this period. The only other real issue I had was determining a neckline, and I went with the keyhole rather than the V-Neck. It will be mostly covered by my veil anyway.
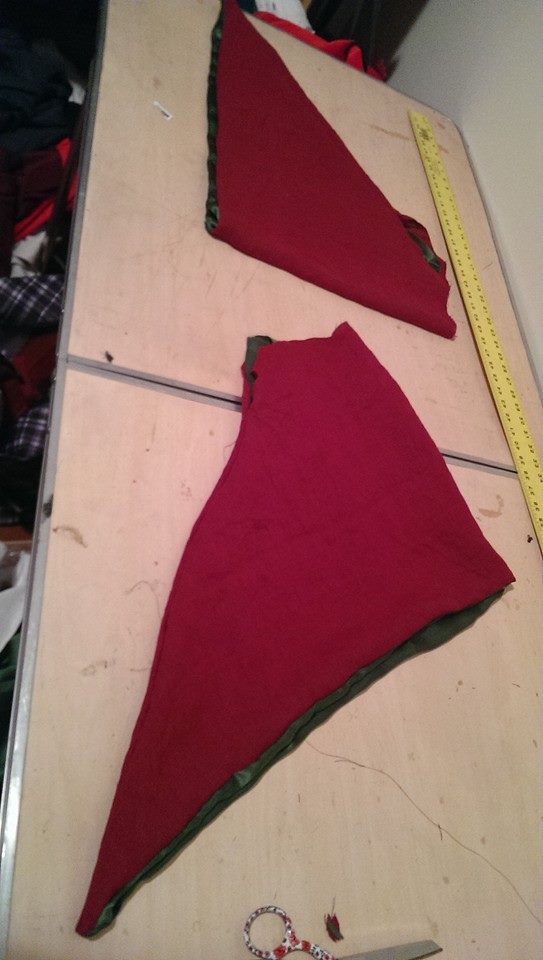
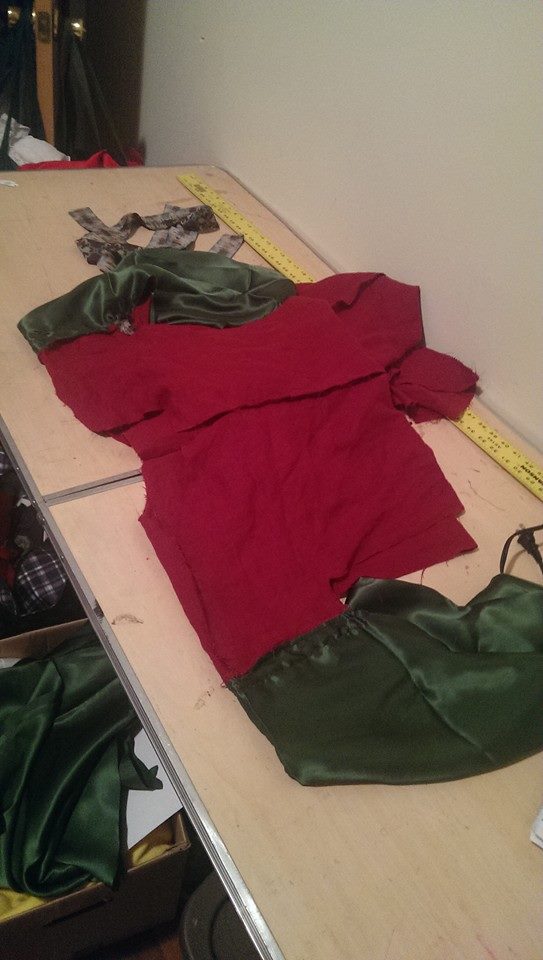
The process didn’t take too long. I made an underdress out of black linen and 4 gores. I threw some trim on the neckline, cuffs and bottom hem. The main gown is made from a deep red linen, that also has 4 gores and cut-out underarms to allow for the easier attaching of the sleeves. The sleeves were really the most tedious part, but still not difficult. Linings don’t scare me, but I ran into some hiccups as far as being able to ensure the hiding of seams but still closing a side seam up after the sleeves were inserted. So I basically had to partially complete the sleeves and then leave about 5-6 inches unsewn so I could attach it to the main body of the dress. Easy enough. Under normal circumstances I would have sewn just the linen together and then finished the green silk lining over the seam by hand, but it was fighting back and some points weren’t matching as well as I planned them too, SO, the silk got machined into the seam and finished with a zig zag. This makes me worry a bit about fraying, but it was the best option given the circumstances, and that I decided to make this 3 days before wearing it. More on that later. Here’s some pictures of the sleeve process.
Before pressing.After pressing.Attached to the body. There’s also trim on the outside, which I should have waited to do by hand.
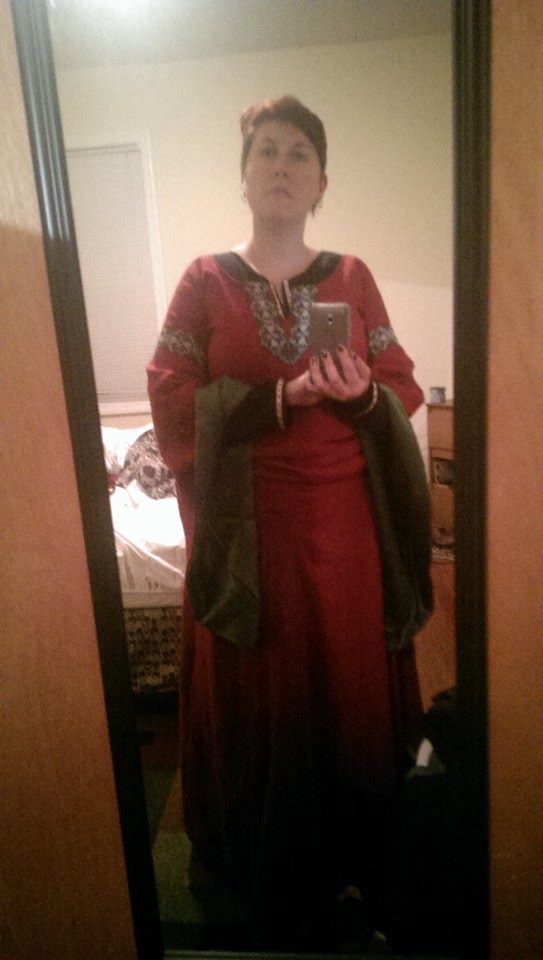
Once the sleeves were on, the dress came together much faster. All I had to do at this point was finish the trim on the neckline, sew on the side gores and then close the sides. The dress itself is a foot longer in the torso than a normal tunic dress, this allows for the ruching look that was desirable during the period. I opted to not lace the side of the dress. This results in some interesting shimmy shimmy shakes to take it off, since I had to take in the sides to make it tight enough.
I told you. Long dress is long. This is what it looked like before I shaped the side seams.
And here’s a snapshot of my first test fitting before taking in the sides.
I pulled in the sides a bit more after this, and made the girdle out of the leftover trim I had. The only REAL mistake I did was attaching the trim on the upper arm before sewing the side seam. This sounded like a great idea at the time, but they don’t match up, which you can kind of see if you’re standing behind me. I expect to hear some crap about that this weekend. So I figure once the event is over, I can go and remove the trim, and replace it by hand so I don’t have that problem. I’m still not sure why my measurements are off.
The only other real “problem?” I’ve lost weight. 8 inches total from my hips alone to be exact from two points, so making a fitted dress earlier in the year was going to be a problem. Chances are if I keep this up, I’m going to have to not just take in more from the sides, but put in the lacings to MAKE it tight enough. This is why I had to wait until last minute to make it. 🙂


 You place the gauge on the fabric, center mark matching to the dead center of where you want the neckline to be. Then, move it forward to where you want the depth of the back to be. I’ve done both 1″ and 1.5″ with good results. The dotted line helps you maintain the angle toward the front, and where you can mark your slit.
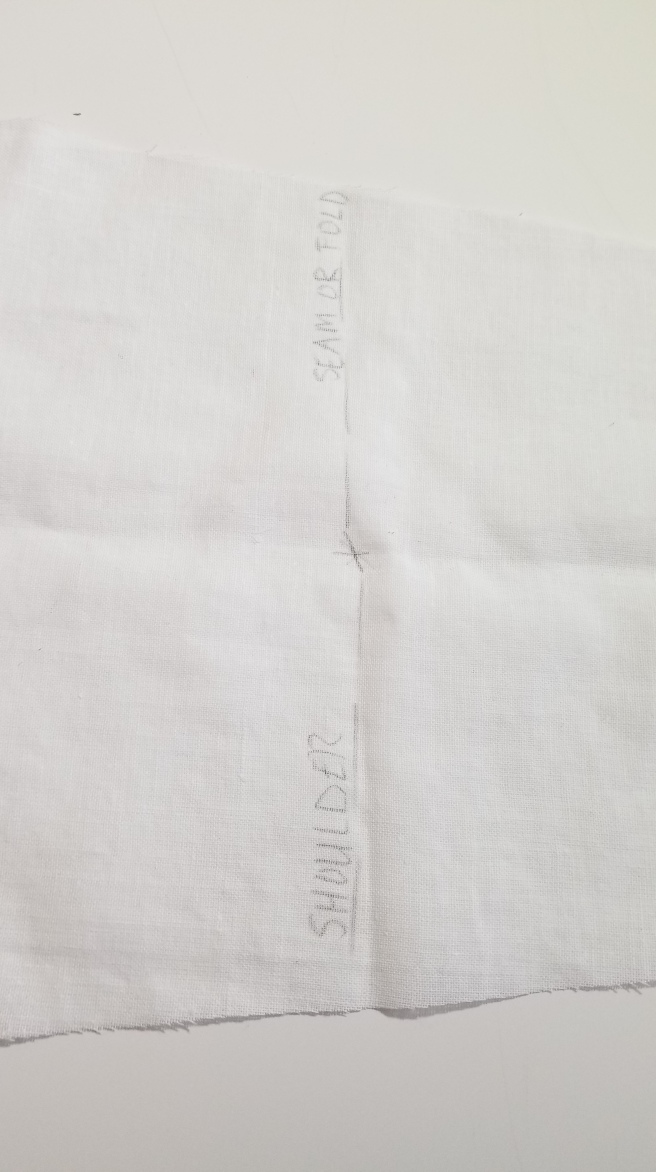


You must be logged in to post a comment.